FreeRTOS Queue

API

Introduction

The objective of this post is to give an introduction to FreeRTOS queues, using the ESP32 and the Arduino core.

Queues are very useful for inter-task communication, allowing to send messages from one task to another safely in terms of concurrency [1]. They are typically used as FIFOs (First In First Out) [1], meaning that new data is inserted at the back of the queue and consumed from the front.

Nonetheless, FreeRTOS has a very rich queue API, which offers a lot more functionality. You can check the queue API here.

One very important aspect to keep in mind is that the data that is inserted in the queue is copied rather that only a reference to it being stored [1]. This means that if we send an integer to the queue, its value will be actually copied and if we change the original value after that no problem should occur.

Nonetheless, we can still insert pointers to data as elements of our queue, which is useful specially if the messages to exchange are big. In this case, the pointer will be copied to the queue, not the message itself, and thus we need to guarantee that it is not changed. But this is a more advanced situation which we are not going to cover here.

Other important behavior to keep in mind is that the insertion in a full queue or the consumption of an empty queue can be made blocking calls for a specified amount of time [1] (this amount of time is a parameter of the API).

QueueHandle_t queue;
 
void setup() {
 
  Serial.begin(115200);
 
  queue = xQueueCreate( 10, sizeof( int ) );
 
  if(queue == NULL){
    Serial.println("Error creating the queue");
  }
 
}
 
void loop() {
 
  if(queue == NULL)return;
 
  for(int i = 0; i<10; i++){
    xQueueSend(queue, &i, portMAX_DELAY);
  }
 
  int element;
 
  for(int i = 0; i<10; i++){
    xQueueReceive(queue, &element, portMAX_DELAY);
    Serial.print(element);
    Serial.print("|");
  }
 
  Serial.println();
  delay(1000);
}

xQueueCreate
Return
If the queue is successfully create then a handle to the newly created queue is returned. If the queue cannot be created then 0 is returned.
Parameters
uxQueueLength: The maximum number of items that the queue can contain.
uxItemSize: The number of bytes each item in the queue will require. Items are queued by copy, not by reference, so this is the number of bytes that will be copied for each posted item. Each item on the queue must be the same size.


xQueueSendToFront,xQueueSendToBack,xQueueSend
Return
pdTRUE if the item was successfully posted, otherwise errQUEUE_FULL.
Parameters
xQueue: The handle to the queue on which the item is to be posted.
pvItemToQueue: A pointer to the item that is to be placed on the queue. The size of the items the queue will hold was defined when the queue was created, so this many bytes will be copied from pvItemToQueue into the queue storage area.
xTicksToWait: The maximum amount of time the task should block waiting for space to become available on the queue, should it already be full. The call will return immediately if this is set to 0 and the queue is full. The time is defined in tick periods so the constant portTICK_PERIOD_MS should be used to convert to real time if this is required.

xQueueReceive
Return
pdTRUE if an item was successfully received from the queue, otherwise pdFALSE.
Parameters
xQueue: The handle to the queue from which the item is to be received.
pvBuffer: Pointer to the buffer into which the received item will be copied.
xTicksToWait: The maximum amount of time the task should block waiting for an item to receive should the queue be empty at the time of the call. xQueueReceive() will return immediately if xTicksToWait is zero and the queue is empty. The time is defined in tick periods so the constant portTICK_PERIOD_MS should be used to convert to real time if this is required.

xQueuePeek
similar to xQueueReceive without remove element from queue

xTaskHandle task;
xQueueHandle queue;
byte tpin=13;

void taskFunction(void* parameter){
  for(;;){
    int val1=0;
    int* val=&val1;
    xQueueReceive(queue,&val,100);//wait the queue for 100 ms if not queue recived it will print 0
    Serial.println(*((int*)val));
  }
  vTaskDelete(task);
}

void setup(){
  Serial.begin(9600);
  //pinMode(tpin,INPUT_PULLUP);
  if(xTaskCreate(taskFunction,"task1",2048,nullptr,tskIDLE_PRIORITY,&task))
    Serial.println("task created");
  queue=xQueueCreate(5,sizeof(void*));//queue contain 5 integer items
}

void loop(){
  delay(1000);
  int val1=touchRead(tpin);
  int* val=&val1;
  xQueueSend(queue,&val,portMAX_DELAY);// if queue is full it will wait for portMAX_DELAY to available space
}
Tagged :

ESP32 FreeRTOS Tasks

API

Tasks

The main job of all operating systems is to run and coordinate user tasks. Like many operating systems, the basic unit of work in FreeRTOS is the task. FreeRTOS uses a Task Control Block (TCB) to represent each task.

Task Control Block (TCB)

The TCB is defined in tasks.c like this:

typedef struct tskTaskControlBlock
{
  volatile portSTACK_TYPE *pxTopOfStack;                  /* Points to the location of
                                                             the last item placed on 
                                                             the tasks stack.  THIS 
                                                             MUST BE THE FIRST MEMBER 
                                                             OF THE STRUCT. */
                                                         
  xListItem    xGenericListItem;                          /* List item used to place 
                                                             the TCB in ready and 
                                                             blocked queues. */
  xListItem    xEventListItem;                            /* List item used to place 
                                                             the TCB in event lists.*/
  unsigned portBASE_TYPE uxPriority;                      /* The priority of the task
                                                             where 0 is the lowest 
                                                             priority. */
  portSTACK_TYPE *pxStack;                                /* Points to the start of 
                                                             the stack. */
  signed char    pcTaskName[ configMAX_TASK_NAME_LEN ];   /* Descriptive name given 
                                                             to the task when created.
                                                             Facilitates debugging 
                                                             only. */

  #if ( portSTACK_GROWTH > 0 )
    portSTACK_TYPE *pxEndOfStack;                         /* Used for stack overflow 
                                                             checking on architectures
                                                             where the stack grows up
                                                             from low memory. */
  #endif

  #if ( configUSE_MUTEXES == 1 )
    unsigned portBASE_TYPE uxBasePriority;                /* The priority last 
                                                             assigned to the task - 
                                                             used by the priority 
                                                             inheritance mechanism. */
  #endif

} tskTCB;


The TCB stores the address of the stack start address in pxStack and the current top of stack in pxTopOfStack. It also stores a pointer to the end of the stack in pxEndOfStack to check for stack overflow if the stack grows “up” to higher addresses. If the stack grows “down” to lower addresses then stack overflow is checked by comparing the current top of stack against the start of stack memory in pxStack.

The TCB stores the initial priority of the task in uxPriority and uxBasePriority. A task is given a priority when it is created, and a task’s priority can be changed. If FreeRTOS implements priority inheritance then it uses uxBasePriority to remember the original priority while the task is temporarily elevated to the “inherited” priority. (See the discussion about mutexes below for more on priority inheritance.)

Each task has two list items for use in FreeRTOS’s various scheduling lists. When a task is inserted into a list FreeRTOS doesn’t insert a pointer directly to the TCB. Instead, it inserts a pointer to either the TCB’s xGenericListItem or xEventListItem. These xListItem variables let the FreeRTOS lists be smarter than if they merely held a pointer to the TCB. We’ll see an example of this when we discuss lists later.

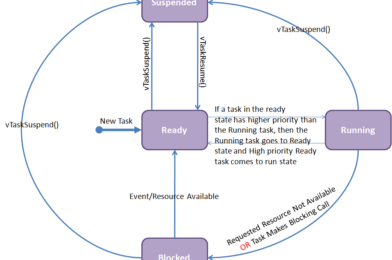
A task can be in one of four states: running, ready to run, suspended, or blocked. You might expect each task to have a variable that tells FreeRTOS what state it’s in, but it doesn’t. Instead, FreeRTOS tracks task state implicitly by putting tasks in the appropriate list: ready list, suspended list, etc. The presence of a task in a particular list indicates the task’s state. As a task changes from one state to another, FreeRTOS simply moves it from one list to another.

xTaskCreatePinnedToCore

Create a new task with a specified affinity.
This function is similar to xTaskCreate, but allows setting task affinity in SMP system.
Return
pdPASS if the task was successfully created and added to a ready list, otherwise an error code defined in the file projdefs.h
Parameters
pvTaskCode: Pointer to the task entry function. Tasks must be implemented to never return (i.e. continuous loop).
pcName: A descriptive name for the task. This is mainly used to facilitate debugging. Max length defined by configMAX_TASK_NAME_LEN – default is 16.
usStackDepth: The size of the task stack specified as the number of bytes.
pvParameters: Pointer that will be used as the parameter for the task being created.
uxPriority: The priority at which the task should run. Systems that include MPU support can optionally create tasks in a privileged (system) mode by setting bit portPRIVILEGE_BIT of the priority parameter. For example, to create a privileged task at priority 2 the uxPriority parameter should be set to ( 2 | portPRIVILEGE_BIT ).
pvCreatedTask: Used to pass back a handle by which the created task can be referenced.
xCoreID: If the value is tskNO_AFFINITY, the created task is not pinned to any CPU, and the scheduler can run it on any core available. Values 0 or 1 indicate the index number of the CPU which the task should be pinned to. Specifying values larger than (portNUM_PROCESSORS – 1) will cause the function to fail.

xTaskCreate

similar to xTaskCreatePinnedToCore but it will work with core 0 like main loop function
Create a new task and add it to the list of tasks that are ready to run.
Internally, within the FreeRTOS implementation, tasks use two blocks of memory. The first block is used to hold the task’s data structures. The second block is used by the task as its stack. If a task is created using xTaskCreate() then both blocks of memory are automatically dynamically allocated inside the xTaskCreate() function. (see http://www.freertos.org/a00111.html). If a task is created using xTaskCreateStatic() then the application writer must provide the required memory. xTaskCreateStatic() therefore allows a task to be created without using any dynamic memory allocation.

vTaskDelete

Remove a task from the RTOS real time kernel’s management.
The task being deleted will be removed from all ready, blocked, suspended and event lists.
INCLUDE_vTaskDelete must be defined as 1 for this function to be available. See the configuration section for more information.
The idle task is responsible for freeing the kernel allocated memory from tasks that have been deleted. It is therefore important that the idle task is not starved of microcontroller processing time if your application makes any calls to vTaskDelete ().
Memory allocated by the task code is not automatically freed, and should be freed before the task is deleted.

create two tasks with different priorities

xTaskHandle task,task2;

void taskFunction(void* parameter){
  for(;;){
    Serial.println("task 1");
    delay(1000);
  }
  vTaskDelete(task); //delete task once you break the loop dont forget to free the memory
}
void taskFunction2(void* parameter){
  for(;;){
    Serial.println("task 2");
    delay(1000);
  }
  vTaskDelete(task);
}

void setup(){
  Serial.begin(9600);
  xTaskCreate(taskFunction,"task1",2048,nullptr,1,&task);
  //at first time resume first but because it has lower priority 
    in the next Time it will be resumed after task2
  xTaskCreate(taskFunction2,"task2",2048,nullptr,2,&task2);
}

void loop(){
}

xTaskCreatePinnedToCore
if value of core is tskNO_AFFINITY, the created task is not pinned to any CPU, and the scheduler can run it on any core available

void taskFunction(void* parameter){
  for(;;){
    Serial.println(xPortGetCoreID());
    vTaskDelay(1000);//similar to delay with arduino
  }
  vTaskDelete(task);
}

void setup(){
  Serial.begin(9600);
  if(xTaskCreatePinnedToCore(taskFunction,"task1",2048,nullptr,2,&task,0)){
    Serial.println("task created and schedualed with ready list ");
  }
}

vTaskDelay and vTaskDelayUntil
vTaskDelay () will cause a task to block for the specified number of ticks from the time vTaskDelay () is called. It is therefore difficult to use vTaskDelay () by itself to generate a fixed execution frequency as the time between a task starting to execute and that task calling vTaskDelay () may not be fixed [the task may take a different path though the code between calls, or may get interrupted or preempted a different number of times each time it executes].
Whereas vTaskDelay () specifies a wake time relative to the time at which the function is called, vTaskDelayUntil () specifies the absolute (exact) time at which it wishes to unblock.

void vTaskFunction( void * pvParameters )
{
TickType_t xLastWakeTime;
const TickType_t xFrequency = 10;

    // Initialise the xLastWakeTime variable with the current time.
    xLastWakeTime = xTaskGetTickCount ();
    for( ;; )
    {
        // Wait for the next cycle.
        vTaskDelayUntil( &xLastWakeTime, xFrequency );

        // Perform action here.
    }
}

eTaskGetState
eRunning = 0
A task is querying the state of itself, so must be running.
eReady
The task being queried is in a read or pending ready list.
eBlocked
The task being queried is in the Blocked state.
eSuspended
The task being queried is in the Suspended state, or is in the Blocked state with an infinite time out.
eDeleted
The task being queried has been deleted, but its TCB(task control block) has not yet been freed.

vTaskSuspend,vTaskResume

void vAFunction( void )
{
TaskHandle_t xHandle;

 // Create a task, storing the handle.
 xTaskCreate( vTaskCode, "NAME", STACK_SIZE, NULL, tskIDLE_PRIORITY, &xHandle );

 // Use the handle to suspend the created task.
 vTaskSuspend( xHandle );

 // The created task will not run during this period, unless
 // another task calls vTaskResume( xHandle ).

 // Resume the suspended task ourselves.
 vTaskResume( xHandle );

 // The created task will once again get microcontroller processing
 // time in accordance with its priority within the system.
}

vTaskSuspendAll,xTaskResumeAll
Suspends the scheduler without disabling interrupts.
Context switches will not occur while the scheduler is suspended.
After calling vTaskSuspendAll () the calling task will continue to execute without risk of being swapped out until a call to xTaskResumeAll () has been made.
API functions that have the potential to cause a context switch (for example, vTaskDelayUntil(), xQueueSend(), etc.) must not be called while the scheduler is suspended.

void vTask1( void * pvParameters )
{
 for( ;; )
 {
     // Task code goes here.

     // ...

     // At some point the task wants to perform a long operation during
     // which it does not want to get swapped out.  It cannot use
     // taskENTER_CRITICAL ()/taskEXIT_CRITICAL () as the length of the
     // operation may cause interrupts to be missed - including the
     // ticks.

     // Prevent the real time kernel swapping out the task.
     vTaskSuspendAll ();

     // Perform the operation here.  There is no need to use critical
     // sections as we have all the microcontroller processing time.
     // During this time interrupts will still operate and the kernel
     // tick count will be maintained.

     // ...

     // The operation is complete.  Restart the kernel.
     xTaskResumeAll ();
 }
}

xTaskGetTickCount
The count of ticks since vTaskStartScheduler was called
uxTaskGetNumberOfTasks
The number of tasks that the real time kernel is currently managing. This includes all ready, blocked and suspended tasks. A task that has been deleted but not yet freed by the idle task will also be included in the count.
xTaskGetIdleTaskHandle,xTaskGetIdleTaskHandleForCPU
It is not valid to call xTaskGetIdleTaskHandle() before the scheduler has been started.

The Idle Task
The idle task is created automatically when the RTOS scheduler is started to ensure there is always at least one task that is able to run. It is created at the lowest possible priority to ensure it does not use any CPU time if there are higher priority application tasks in the ready state.
The idle task is responsible for freeing memory allocated by the RTOS to tasks that have since been deleted. It is therefore important in applications that make use of the vTaskDelete() function to ensure the idle task is not starved of processing time. The idle task has no other active functions so can legitimately be starved of microcontroller time under all other conditions.
It is possible for application tasks to share the idle task priority (tskIDLE_PRIORITY). See the configIDLE_SHOULD_YIELD configuration parameter for information on how this behaviour can be configured.

RTOS (Real Time Operating System)

What is Real Time Operating System (RTOS)- How it works?

                When we hear the word “Operating System” the first ones that come to our mind are those we experience/use in our day to day life, say, Windows XP, Linux, Ubuntu, Windows 7 for Computer systems, Android for mobiles and many more . We mainly know that operating systems are for computers. It is a fact that most of the digital electronic devices run some sort of operating systems inside. There are many operating systems developed for micro controllers too. But here it is familiar as REAL TIME OPERATING SYSTEM. The phrase ‘REAL TIME’ indicates that the response of the operating systems is quick. Microcontrollers don’t have much space for code. Thus the operating systems have less scope to be advanced. They try to provide at least the minimum scope of threading, scheduling and monitoring of multiple tasks for small systems.

                Usually, Real Time Operating Systems are a segment or a part of the whole program that decides the next task, task priority, handles the task messages and coordinates all of the tasks. An RTOS is a complex concept. I’d like to discuss about the concept of State Machine. Here is an implementation of what you can merrily call a state machine.

while(1)
switch(state)
{ case 1: //Code for Task 1;
state= 2;
case 2: //Code for Task 2;
state= 3;
case 3: //Code for Task 3;
state= 4;
case 4: //Code for Task 4;
state=1;
}

As you can see from the code, there is a provision of changing the execution sequence. And it can be further modified and made complex. The programmer can modify and place decision making statements (Like if, if-else, switch-case) to switch the task. And the flow of execution can be logically determined.

                A Real time operating system handles some tasks or routines to be run. The kernel of the operating system assigns CPU attention to a particular task for a period of time. It also checks the task priority, arranges the massages from tasks and schedules.

The basic functionalities an RTOS are:

  • Scheduler
  • RTOS Services
  • Synchronization and messaging

The Scheduler

Tasks, can have three states.

  • Ready to run:  When task have all the resources to run, but not in running state. It’s called a ready to run task. It’s the state before running.
  • Running  – When a task is executing. It is known as running.
  • Blocked – When a task doesn’t have enough resources to run, it is sent to a blocked state.

        To schedule a task, three techniques are adapted.

  • Co-operative scheduling:  In this scheme, a task runs, until it completes its execution.
  • Round Robin Scheduling: Each task is assigned a fixed time slot in this scheme. The task needs to complete its execution. Otherwise, the task may lose its flow, and data generated or it would have to wait for its next turn.
  • Preemptive Scheduling:  This scheduling scheme includes priority dependent time allocation. Usually in programs, 256 priority level is generally used. Each task is assigned an unique priority level. While some system may support more priority levels, and multiple tasks may have same priorities.

The Kernel takes care of the task. It involves the following

  • Creating a task
  • Deleting a task
  • Changing the priority of the task
  • Changing state of the task

RTOS Services

The heart of every operating system is called ‘kernel’. Tasks are relived of monitoring the hardware. It’s the responsibility of the kernel to manage and allocate the resources. As tasks cannot acquire CPU attention all the time, the kernel must also provide some more services. These includes,

  • Interrupt handling services
  • Time services
  • Device management services
  • Memory management services
  • Input-output services

Messaging

Messaging provides a means of communication with other system and between the tasks. The messaging services includes

  • Semaphores
  • Event flags
  • Mailboxes
  • Pipes
  • Message queues

Semaphores are used to synchronize access to shared resources, such as common data areas. Event flags are used to synchronize the inter-task activities. Mailboxes, pipes, and message queues are used to send messages among tasks.

Arduino AND ESP32 Wire Library

functions

begin()
Initiate the Wire library and join the I2C bus as a master or slave. This should normally be called only once.
Parameters
Arduino
address: the 7-bit slave address (optional); if not specified, join the bus as a master.
ESP32
there are no address only you can select scl gpio , sda gpio and frequency

requestFrom()
Used by the master to request bytes from a slave device.
Syntax
Wire.requestFrom(address, quantity)
Wire.requestFrom(address, quantity, stop)
Parameters
address: the 7-bit address of the device to request bytes from
quantity: the number of bytes to request
stop : boolean. true will send a stop message after the request, releasing the bus. false will continually send a restart after the request, keeping the connection active.
Returns
byte : the number of bytes returned from the slave device

beginTransmission()
Begin a transmission to the I2C slave device with the given address.
Parameters :
the 7-bit address of the device to transmit to

endTransmission()
Ends a transmission to a slave device
Syntax
Wire.endTransmission()
Wire.endTransmission(stop)
Parameters
stop : boolean. true will send a stop message, releasing the bus after transmission. false will send a restart, keeping the connection active.
Returns
byte, which indicates the status of the transmission:

  • 0:success
  • 1:data too long to fit in transmit buffer
  • 2:received NACK on transmit of address
  • 3:received NACK on transmit of data
  • 4:other error

write()
Writes data from a slave device in response to a request from a master, or queues bytes for transmission from a master to slave device (in-between calls to beginTransmission() and endTransmission()).
Syntax
Wire.write(value)
Wire.write(string)
Wire.write(data, length)
Parameters
value: a value to send as a single byte
string: a string to send as a series of bytes
data: an array of data to send as bytes
length: the number of bytes to transmit
Returns
byte: write() will return the number of bytes written, though reading that number is optional

available()
Returns the number of bytes available for retrieval with read(). This should be called on a master device after a call to requestFrom() or on a slave inside the onReceive() handler.
Returns
The number of bytes available for reading.

read()
Reads a byte that was transmitted from a slave device to a master after a call to requestFrom() or was transmitted from a master to a slave.
Returns
The next byte received

SetClock()
This function modifies the clock frequency for I2C communication. I2C slave devices have no minimum working clock frequency, however 100KHz is usually the baseline.
Syntax
Wire.setClock(clockFrequency)
Parameters
clockFrequency: the value (in Hertz) of desired communication clock. Accepted values are 100000 (standard mode) and 400000 (fast mode). Some processors also support 10000 (low speed mode), 1000000 (fast mode plus) and 3400000 (high speed mode). Please refer to the specific processor documentation to make sure the desired mode is supported.

onReceive()
Registers a function to be called when a slave device receives a transmission from a master.
Parameters
handler: the function to be called when the slave receives data; this should take a single int parameter (the number of bytes read from the master) and return nothing, e.g.: void myHandler(int numBytes)

onRequest()
Register a function to be called when a master requests data from this slave device.
Parameters
handler: the function to be called, takes no parameters and returns nothing

ESP32

in esp32 you can create more than one i2c bus by Create Object from TwoWire instead of using public general object Wire

The ESP32 supports I2C communication through its two I2C bus interfaces that can serve as I2C master or slave, depending on the user’s configuration. Accordingly to the ESP32 datasheet, the I2C interfaces of the ESP32 supports:

  • Standard mode (100 Kbit/s) 
  • Fast mode (400 Kbit/s) 
  • Up to 5 MHz, yet constrained by SDA pull-up strength 
  • 7-bit/10-bit addressing mode 
  • Dual addressing mode. Users can program command registers to control I²C interfaces, so that they have more flexibility

The SDA and SCL lines are active low, so they should be pulled up with resistors. Typical values are 4.7k Ohm for 5V devices and 2.4k Ohm for 3.3V devices.

Most sensors we use in our projects are breakout boards that already have the resistors built-in. So, usually, when you’re dealing with this type of electronics components you don’t need to worry about this.

Connecting an I2C device to an ESP32 is normally as simple as connecting GND to GND, SDA to SDA, SCL to SCL and a positive power supply to a peripheral, usually 3.3V (but it depends on the module you’re using).

Examples

master esp32

#include <Arduino.h>
#include <Wire.h>


TwoWire i2c(0);//you can use general Wire object or create one by TwoWire

void setup(){
  Serial.begin(9600);
  i2c.begin(33,32,8000000);
}

void loop(){
  i2c.beginTransmission(4);
  i2c.write("hello there");
  Serial.println("send data");
  i2c.endTransmission();
  delay(1000);
  i2c.requestFrom(4,10,true);// true for stop connection for can use beginTransmission next time
  while(i2c.available())    // slave may send less than requested
  { 
    char c = i2c.read(); // receive a byte as character
    Serial.print(c);         // print the character
  }
  delay(5000);

}

slave arduino

#include<Wire.h>

void receiveEvent(int coutn){
  while(0 < Wire.available()) 
  {
    char c = Wire.read(); 
    Serial.print(c);         
  }
  Serial.println("");
}

void requestEvent(int count){
  Wire.write("hi how are");
  Serial.println(String("master request ")+String(count));
}

void setup() {
  Serial.begin(9600);
  Wire.begin(4);
  
  Wire.onReceive(receiveEvent);
  Wire.onRequest(requestEvent);

}

void loop() {
  delay(100);

}

Scan available addresses

#include <Wire.h>
 
void setup() {
  Wire.begin();
  Serial.begin(115200);
  Serial.println("\nI2C Scanner");
}
 
void loop() {
  byte error, address;
  int nDevices;
  Serial.println("Scanning...");
  nDevices = 0;
  for(address = 1; address < 127; address++ ) {
    Wire.beginTransmission(address);
    error = Wire.endTransmission();
    if (error == 0) {
      Serial.print("I2C device found at address 0x");
      if (address<16) {
        Serial.print("0");
      }
      Serial.println(address,HEX);
      nDevices++;
    }
    else if (error==4) {
      Serial.print("Unknow error at address 0x");
      if (address<16) {
        Serial.print("0");
      }
      Serial.println(address,HEX);
    }    
  }
  if (nDevices == 0) {
    Serial.println("No I2C devices found\n");
  }
  else {
    Serial.println("done\n");
  }
  delay(5000);          
}
Tagged : / /