FreeRTOS timer

API

How it Works

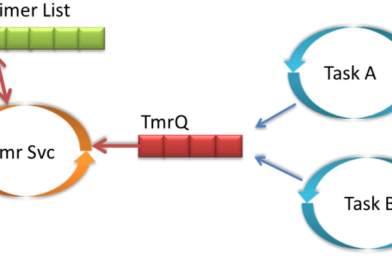
The following diagram gives an overview, how Software Timers in FreeRTOS are implemented:

FreeRTOS Software Timers

FreeRTOS Software Timers

There is a dedicated Tmr Svc (Timer Service or Deamon) task that maintains an ordered list of software timers, with the timer to expire next in front of the list). The Timer Service task is not continuously running: from the Timer List, the task knows the time when it has to wake up each time a timer in the timer list has expired. When a timer has expired, the Timer Service task calls its callback (the Timer callback).

The other concept the Timer task is using is a queue: this queue is used for inter-process communication. Using that queue, other tasks can send commands to the timer task, for example, to start or stop a timer. The Timer Task will wake up when something is sent to that queue. And that way, the Timer API has parameters like ‘ticksToWait’ to specify the waiting time if the timer queue is full.

One-Shot and Auto-Reload

FreeRTOS software timers support two different software timer, configured at timer creation time:

  • One-Shot: When the timer expires, it is not restarted again. I still can restart it at a later time. Making it ideal for a ‘one-shot’ kind of thing.
  • Auto-Reload: This timer will automatically be restarted when it expires, making it ideal for periodic kinds of things.

Timer Task and FreeRTOSConfig.h

To use FreeRTOS timers, you have to turn them on with the following entry in FreeRTOSConfig.h:

#define configUSE_TIMERS 1

If you are not using FreeRTOS software timers, set that macro to 0, otherwise, your application is using more resources than necessary. Because this creates the ‘Tmr Svc’ task during vTaskStartScheduler():

TmrSvc Created

TmrSvc Created

In the above screenshot (Event Object column) you can see as well that the Tmr Svc is waiting for receiving an object in the TmrQ queue.

This timer task is responsible to handle all FreeRTOS software timers in the system. Basically, it checks if a timer has been expired and calls the associated timer hook.

The timer task name, priority and stack size can be configured with the following macros in FreeRTOSConfig.h


#define configTIMER_SERVICE_TASK_NAME "Tmr Svc"
#define configTIMER_TASK_PRIORITY (configMAX_PRIORITIES - 1)
#define configTIMER_TASK_STACK_DEPTH (configMINIMAL_STACK_SIZE * 2)

I recommend giving the timer task the highest task priority in the system, otherwise, you will see some latency in the timer hook execution. The timer stack size really depends on what you are doing in the timer hooks called from the timer task. To find out what your tasks are using on the stack, see Understanding FreeRTOS Task Stack Usage and Kernel awareness Information.

Timer Queue and FreeRTOSConfig.h

The other thing that gets created is a queue for the timer task, named ‘TmrQ’:

TmrQ Queue for Timer Task

TmrQ Queue for Timer Task

This queue is used for IPC (Inter-Process Communication) between the timer task and the other tasks of the system. The length of the queue can be configured with the following macro, while the name of the queue “TmrQ” is hard-coded in the RTOS:

#define configTIMER_QUEUE_LENGTH 10

The question might be: What is a useful length for that queue? Because the longer it is, the more RAM is used. Basically, the queue needs to hold as many command items which can be sent by other tasks (or interrupts) until they can be served by the Timer Task. With the Timer task having the highest priority in the system, the queue can be smaller. But if multiple commands can be sent from higher priority tasks or from interrupts, make sure your queue is long enough for this.

Creating a Software Timer

In this example, I’m going to create a software timer that blinks an LED every second. To create a new software timer, I need a timer handle for it:

xTimerHandle timerHndl1Sec;

Below is the API to create a new timer:

TimerHandle_t xTimerCreate( const char * const pcTimerName, 
    const TickType_t xTimerPeriodInTicks,
    const UBaseType_t uxAutoReload,
    void * const pvTimerID,
    TimerCallbackFunction_t pxCallbackFunction )

To create a new timer, I use:


timerHndl1Sec = xTimerCreate(
      "timer1Sec", /* name */
      pdMS_TO_TICKS(1000), /* period/time */
      pdTRUE, /* auto reload */
      (void*)0, /* timer ID */
      vTimerCallback1SecExpired); /* callback */
if (timerHndl1Sec==NULL) {
    for(;;); /* failure! */
}

The first parameter is a string for the timer name, followed by the timer (initial) period in RTOS timer ticks. The next parameter with ‘pdTRUE’ requests an ‘auto-reload’ timer, which means the timer is a periodic one, and not a one-shot timer. Next, I can provide a timer ID (pointer to void) and finally the most important thing: the timer callback. The callback is the function which will get called when the timer expires.

Naturally, the shortest period time you can reach with a FreeRTOS software timer is a single tick period. So if your FreeRTOS is running with a 1 kHz tick period, you only can implement a 1 kHz software timer that way. If it needs to be faster, you have to consider using a hardware timer.

The xTimerCreate() only creates the timer, but does not start it. This will be the next topic.

Because a timer creation can fail (e.g. running out of memory), it is good practice to check the returned timer handle.

Timer Callback

During xTimerCreate(), I had to specify a callback (function pointer). I want to toggle an LED, so my callback looks like this:


static void vTimerCallback1SecExpired(xTimerHandle pxTimer) {
    GPIO_PortToggle(BOARD_INITPINS_LED_RED_GPIO, 1<<BOARD_INITPINS_LED_RED_PIN); /* toggle red LED */
}

As the timer callbacks are called from the Timer Service task, it is important that the callback function does not block (e.g. waits for some time or waits for a semaphore), as otherwise, all other timers get delayed. So the general rule for a timer callback function (as for interrupt service routines) is to keep it short and simple!

Starting a Timer

A timer previously created with xTimerCreate() gets started with:

BaseType_t xTimerStart( TimerHandle_t xTimer, TickType_t xTicksToWait );

Here, the ‘ticksToWait’ indicates the queue API and specifies how long the caller shall wait if the timer queue is already full.

I create a timer with:


if (xTimerStart(timerHndl1Sec, 0)!=pdPASS) {
    for(;;); /* failure!?! */
}

The above code will fail if the timer queue will not be large enough. This will start the timer with the given period (at creation time). If the timer is started before the scheduler is started, the timer will start to run at scheduler start time. If the timer is started say from a task, it starts at the current tick time at which xTimerStart() is called.

Below is a live plot of the 1-second software timer in MCUXpresso IDE (Eclipse-based):

Plot of 1 Sec Timer

Plot of 1 Sec Timer

Resetting a Timer

With…

BaseType_t xTimerReset( TimerHandle_t xTimer, TickType_t xTicksToWait );

… a timer can be reset. And if that timer has not already been started, it will start the timer. I’m going to use that for my next example. For a display, I want to keep the backlight on for 5 seconds, and when the user presses a button, that 5 seconds shall start again. So that timer acts as a timeout timer: If it does not get reset by a button, it will expire after 5 seconds.

Again, I create a software timer. But this time, I do not start it:


xTimerHandle timerHndl5SecTimeout;
timerHndl5SecTimeout = xTimerCreate(
    "timerGreen", /* name */
    pdMS_TO_TICKS(5000), /* period/time */
    pdFALSE, /* auto reload */
    (void*)1, /* timer ID */
    vTimerCallback5SecExpired); /* callback */
    if (timerHndl5SecTimeout==NULL) {
        for(;;); /* failure! */
}

The callback looks like this:

static void vTimerCallback5SecExpired(xTimerHandle pxTimer) {
   /* this timer callback turns off the green LED */
   GPIO_PortSet(BOARD_INITPINS_LCD_BACKGROUND_LIGHT, 1<<BOARD_INITPINS_LCD_BACKGROUND_LIGHT_PIN); /* turn off LCD Light */
}

Inside a task, I’m checking the user buttons (e.g. for menu navigation). Here I turn on the LCD backlight and start the timeout timer:

if (!GPIO_PinRead(BOARD_INITPINS_SW3_GPIO, BOARD_INITPINS_SW3_PIN)) { /* pin LOW ==> SW03 push button pressed */
    GPIO_PortClear(BOARD_INITPINS_LCD_BACKGROUND_LIGHT, 1<<BOARD_INITPINS_LCD_BACKGROUND_LIGHT_PIN); /* Turn green LED on */
    if (xTimerReset(timerHndl5SecTimeout, 0)!=pdPASS) { /* start timer to turn off LCD after 5 seconds */
        for(;;); /* failure?!? */
    }
}

So when the user presses a button, it will restart the timer, and if it expires, it will turn off the LCD backlight. Below a plot with the two timers in action:

LCD Backlight with FreeRTOS Sotware Timers

LCD Backlight with FreeRTOS Software Timers

Other Timer Functions

The FreeRTOS Software Timer API provides more:

  • Changing timer period
  • Deleting a timer
  • Get and Set the Timer ID
  • Get timer name, period and expiry time
  • Get the timer task handle
FreeRTOS Software Timer Functions

FreeRTOS Software Timer Functions

Timer functions can be called from an interrupt service routine if they have the FromISR in the name.

A rather special one is xTimerPendFunctionCall(): With that API method, I can send to the timer deamon task a callback/function pointer to be called. Basically a ‘dear timer task, please execute this function for me.’ This function will be called immediately (and only once) when the timer deamon tasks remove the command from the timer queue.

Summary

Software timers are very useful: I can implement multiple periodic or one-shot/timeout timers with a single timer (deamon) task. That way, I don’t need extra hardware timers and I need fewer resources than using a task for each periodic action.

examles

xTimerHandle timer;
void onTimeup(xTimerHandle handle){
  Serial.println((char*)pvTimerGetTimerID(handle));//my timer
  Serial.println(xTimerGetExpiryTime(handle)-xTaskGetTickCount());// 10000 if auto reload parameter in create equal pdtrue or 0 if pdfalse
}

void setup(){
  Serial.begin(9600);
  timer=xTimerCreate("timer1",10000,pdTRUE,(void*)"my timer",onTimeup);//pdtrue for autoreload id my timer 
  xTimerStart(timer,0);//start timer with 0 wait 

}
Tagged :

FreeRTOS Semaphore

What is a Semaphore?
Semaphore is a technique for synchronizing two/more task competing for the same resources. When a task wants to use a resource, it requests for the semaphore and will be allocated if the semaphore is available. If the semaphore is not available then the requesting task will go to blocked state till the semaphore becomes free.
Consider a situation where there are two persons who want to share a bike. At one time only one person can use the bike. The one who has the bike key will get the chance to use it. And when this person gives the key to the 2nd person, then the 2nd person can use the bike.
Semaphore is just like this Key and the bike is the shared resource. Whenever a task wants access to the shared resource, it must acquire the semaphore first. The task should release the semaphore after it is done with the shared resource. Until this time all other tasks have to wait if they need
access to shared resource as semaphore is not available. Even if the task trying to acquire the semaphore is of higher priority than the task acquiring the semaphore, it will be in the wait state until the semaphore is released by the lower priority task.

Types of Semaphores
There are 3-types of semaphores namely Binary, Counting and Mutex semaphore.

• Binary Semaphore: Binary semaphore is used when there is only one shared resource. Binary semaphore exists in two states ie.Acquired(Take), Released(Give). Binary semaphores have no ownership and can be released by any task or ISR regardless of who performed the last take operation. Because of this binary semaphores are often used to synchronize tasks with external events implemented as ISRs, for example waiting for a packet from a network or waiting for a button is pressed. Because there is no ownership concept a binary semaphore object can be created to be either in the ?taken? or ?not taken? state initially.
Cons:
Priority Inversion : HPT needs to wait for the LPT as LPT is holding the resource required for HPT. In between if MPT task comes then LPT will be in blocked state thereby delaying HPT.
1. Does not support recursion : If a task tries to take the semaphore twice then it gets blocked and will not come out of that state till someone releases that semaphore.
2. No ownership : Anyone can release or delete the semaphore because of which the dependent tasks will always be in the blocked state.

. Counting Semaphore: To handle more than one shared resource of the same type, counting semaphore is used. Counting semaphore will be initialized with the count(N) and it will allocate the resource as long as count becomes zero after which the requesting task will enter blocked
state.

•Mutex Semaphore: Mutex is very much similar to binary semaphore and takes care of priority inversion, ownership, and recursion.

Mutex semaphore

It is like a key that associated with the resource. The task holds the key, will lock the resource, process it then unlock and give back the key so that other tasks can use it. This mechanism is similar to binary semaphore except that the task that take the key have to release the key.
Note: Suppose that we have 2 tasks: the low priority task and the high priority task. These tasks are waiting for the key and the low priority task has chance to hold the key then it will block the high priority task and continue executing.

xTaskHandle task1,task2;
xSemaphoreHandle mutex;

void taskFunction1(void* parameter){
  for(;;){
    xSemaphoreTake(mutex,portMAX_DELAY);
    Serial.println("task 1 take semaphore");
    vTaskDelay(10000);
    xSemaphoreGive(mutex);
    Serial.println("task 1 leave semaphore");
    vTaskDelay(10);//because task 1 has higher priority once it give semaphore it take it again you shoudl to put it in block for alittle period time
  }
  vTaskDelete(&task1);
}

void taskFunction2(void* parameter){
  for(;;){
    xSemaphoreTake(mutex,portMAX_DELAY);
    Serial.println("task 2 take semaphore");
    vTaskDelay(1000);
    xSemaphoreGive(mutex);
    Serial.println("task 2 leave semaphore");
  }
  vTaskDelete(&task2);
}

void setup(){
  Serial.begin(9600);
  mutex=xSemaphoreCreateMutex();
  xTaskCreate(::taskFunction1,"task1",4096,nullptr,tskIDLE_PRIORITY+1,&task1);
  xTaskCreate(::taskFunction2,"task2",4096,nullptr,tskIDLE_PRIORITY,&task2);
}

void loop(){
  delay(500);
  Serial.println(xSemaphoreGetMutexHolder(mutex)==task1);// 1 if task 1 is take mutex
}
SemaphoreHandle_t xMutex;
void setup() {
  Serial.begin(112500);
  /* create Mutex */
  xMutex = xSemaphoreCreateMutex();
  
  xTaskCreate(
      lowPriorityTask,           /* Task function. */
      "lowPriorityTask",        /* name of task. */
      1000,                    /* Stack size of task */
      NULL,                     /* parameter of the task */
      1,                        /* priority of the task */
      NULL);                    /* Task handle to keep track of created task */
  delay(500);
  /* let lowPriorityTask run first then create highPriorityTask */
  xTaskCreate(
      highPriorityTask,           /* Task function. */
      "highPriorityTask",        /* name of task. */
      1000,                    /* Stack size of task */
      NULL,                     /* parameter of the task */
      4,                        /* priority of the task */
      NULL);                    /* Task handle to keep track of created task */
}

void loop() {

}
void lowPriorityTask( void * parameter )
{
  Serial.println((char *)parameter);
  for(;;){
    Serial.println("lowPriorityTask gains key");
    xSemaphoreTake( xMutex, portMAX_DELAY );
    /* even low priority task delay high priority 
    still in Block state */
    delay(2000);
    Serial.println("lowPriorityTask releases key");
    xSemaphoreGive( xMutex );
  }
  vTaskDelete( NULL );
}

void highPriorityTask( void * parameter )
{
  Serial.println((char *)parameter);
  for(;;){
    Serial.println("highPriorityTask gains key");
    /* highPriorityTask wait until lowPriorityTask release key */
    xSemaphoreTake( xMutex, portMAX_DELAY );
    Serial.println("highPriorityTask is running");
    Serial.println("highPriorityTask releases key");
    xSemaphoreGive( xMutex );
    /* delay so that lowPriorityTask has chance to run */
    delay(1000);
  }
  vTaskDelete( NULL );
}

xSemaphoreCreateMutex
Mutexes created using this function can be accessed using the xSemaphoreTake() and xSemaphoreGive() macros. The xSemaphoreTakeRecursive() and xSemaphoreGiveRecursive() macros must not be used.
This type of semaphore uses a priority inheritance mechanism so a task ‘taking’ a semaphore MUST ALWAYS ‘give’ the semaphore back once the semaphore it is no longer required.
Mutex type semaphores cannot be used from within interrupt service routines.
See vSemaphoreCreateBinary() for an alternative implementation that can be used for pure synchronisation (where one task or interrupt always ‘gives’ the semaphore and another always ‘takes’ the semaphore) and from within interrupt service routines.

xSemaphoreTake
Return
pdTRUE if the semaphore was obtained. pdFALSE if xBlockTime expired without the semaphore becoming available.
Parameters
xSemaphore: A handle to the semaphore being taken – obtained when the semaphore was created.
xBlockTime: The time in ticks to wait for the semaphore to become available. The macro portTICK_PERIOD_MS can be used to convert this to a real time. A block time of zero can be used to poll the semaphore. A block time of portMAX_DELAY can be used to block indefinitely (provided INCLUDE_vTaskSuspend is set to 1 in FreeRTOSConfig.h).

xSemaphoreGive
This macro must not be used from an ISR. See xSemaphoreGiveFromISR () for an alternative which can be used from an ISR.
Return
pdTRUE if the semaphore was released. pdFALSE if an error occurred. Semaphores are implemented using queues. An error can occur if there is no space on the queue to post a message – indicating that the semaphore was not first obtained correctly.
Parameters
xSemaphore: A handle to the semaphore being released. This is the handle returned when the semaphore was created.

Binary semaphore

– This is the simplest way to control the access of resources that only have 2 states: locked/unlocked or unavailable/available.
– The task that want to gains the resource will call xSemaphoreTake(). There are 2 cases:
+ If it is successful to access the resource it will keep the resource until it call xSemaphoreGive() to release resource so that other tasks can gain it.
+ If it is failed it will wait until the resource is released by another task.
– Binary semaphore will be applied to interrupt (ISR) processing where the ISR callback function will call xSemaphoreGiveFromISR() to delegate the interrupt processing to the task that call xSemaphoreTake() (when xSemaphoreTake() is called, the task will move to Block state and waiting interrupt event).
Note:
– Binary semaphore that we use in this demo is a little bit different comparing to the standard theory above because the task that call xSemaphoreTake() will not release semaphore.
– API functions that are called from ISR callback must have prefix “FromISR” (xSemaphoreGiveFromISR). They are designed for Interrupt safe API functions.

int tpin=13;
xTaskHandle task1,task2;
xSemaphoreHandle binary;
long unsigned int lastTouch;

void taskFunction1(void* parameter){
  for(;;){
    xSemaphoreTake(binary,portMAX_DELAY);
    Serial.println("task 1 take semaphore");
    vTaskDelay(10000);
    xSemaphoreGive(binary);
    Serial.println("task 1 leave semaphore");
    vTaskDelay(10);//because task 1 has higher priority once it give semaphore it take it again you shoudl to put it in block for alittle period time
  }
  vTaskDelete(&task1);
}

void taskFunction2(void* parameter){
  for(;;){
    xSemaphoreTake(binary,portMAX_DELAY);
    Serial.println("task 2 take semaphore");
    vTaskDelay(1000);
    xSemaphoreTake(binary,portMAX_DELAY);
    Serial.println("task 2 take semaphore 2");
    vTaskDelay(1000);
  }
  vTaskDelete(&task2);
}

void touchInterrupt(){
  if(millis()-lastTouch>1000){
    Serial.println("touch");
    lastTouch=millis();
    BaseType_t bt=pdTRUE;
    xSemaphoreGiveFromISR(binary,&bt);
  }
}

void setup(){
  Serial.begin(9600);
  binary=xSemaphoreCreateBinary();
  xTaskCreate(::taskFunction1,"task1",4096,nullptr,tskIDLE_PRIORITY+1,&task1);
  xTaskCreate(::taskFunction2,"task2",4096,nullptr,tskIDLE_PRIORITY+0,&task2);
  touchAttachInterrupt(tpin,touchInterrupt,20);
}
/* LED pin */
byte ledPin = 14;
/* pin that is attached to interrupt */
byte interruptPin = 12;
/* hold the state of LED when toggling */
volatile byte state = LOW;
SemaphoreHandle_t xBinarySemaphore;

void setup() {
  Serial.begin(115200);
  pinMode(ledPin, OUTPUT);
  /* set the interrupt pin as input pullup*/
  pinMode(interruptPin, INPUT_PULLUP);
  /* attach interrupt to the pin
  function blink will be invoked when interrupt occurs
  interrupt occurs whenever the pin change value */
  attachInterrupt(digitalPinToInterrupt(interruptPin), ISRcallback, CHANGE);
  /* initialize binary semaphore */
  xBinarySemaphore = xSemaphoreCreateBinary();
  /* this task will process the interrupt event 
  which is forwarded by interrupt callback function */
  xTaskCreate(
    ISRprocessing,           /* Task function. */
    "ISRprocessing",        /* name of task. */
    1000,                    /* Stack size of task */
    NULL,                     /* parameter of the task */
    4,                        /* priority of the task */
    NULL);  
}

void loop() {
}

/* interrupt function callback */
void ISRcallback() {
  /* */
  BaseType_t xHigherPriorityTaskWoken = pdFALSE;
  /* un-block the interrupt processing task now */
  xSemaphoreGiveFromISR( xBinarySemaphore, &xHigherPriorityTaskWoken );
}

/* this function will be invoked when additionalTask was created */
void ISRprocessing( void * parameter )
{
  Serial.println((char *)parameter);
  /* loop forever */
  for(;;){
    /* task move to Block state to wait for interrupt event */
    xSemaphoreTake( xBinarySemaphore, portMAX_DELAY );
    Serial.println("ISRprocessing is running");
    /* toggle the LED now */
    state = !state;
    digitalWrite(ledPin, state);
  }
  vTaskDelete( NULL );
}
touch
task 1 take semaphore
task 1 leave semaphore
task 2 take semaphore
touch
task 1 take semaphore
task 1 leave semaphore
task 2 take semaphore 2

xSemaphoreGiveFromISR
to release a semaphore. The semaphore must have previously been created with a call to vSemaphoreCreateBinary() or xSemaphoreCreateCounting().
Return
pdTRUE if the semaphore was successfully given, otherwise errQUEUE_FULL.
parameters :
xSemaphore: A handle to the semaphore being released. This is the handle returned when the semaphore was created.
[out] pxHigherPriorityTaskWoken: xSemaphoreGiveFromISR() will set *pxHigherPriorityTaskWoken to pdTRUE if giving the semaphore caused a task to unblock, and the unblocked task has a priority higher than the currently running task. If xSemaphoreGiveFromISR() sets this value to pdTRUE then a context switch should be requested before the interrupt is exited.

recursive mutex

SemaphoreHandle_t xMutex = NULL;

// A task that creates a mutex.
void vATask( void * pvParameters )
{
   // Create the mutex to guard a shared resource.
   xMutex = xSemaphoreCreateRecursiveMutex();
}

// A task that uses the mutex.
void vAnotherTask( void * pvParameters )
{
   // ... Do other things.

   if( xMutex != NULL )
   {
       // See if we can obtain the mutex.  If the mutex is not available
       // wait 10 ticks to see if it becomes free.
       if( xSemaphoreTakeRecursive( xSemaphore, ( TickType_t ) 10 ) == pdTRUE )
       {
           // We were able to obtain the mutex and can now access the
           // shared resource.

           // ...
           // For some reason due to the nature of the code further calls to
           // xSemaphoreTakeRecursive() are made on the same mutex.  In real
           // code these would not be just sequential calls as this would make
           // no sense.  Instead the calls are likely to be buried inside
           // a more complex call structure.
           xSemaphoreTakeRecursive( xMutex, ( TickType_t ) 10 );
           xSemaphoreTakeRecursive( xMutex, ( TickType_t ) 10 );

           // The mutex has now been 'taken' three times, so will not be
           // available to another task until it has also been given back
           // three times.  Again it is unlikely that real code would have
           // these calls sequentially, but instead buried in a more complex
           // call structure.  This is just for illustrative purposes.
           xSemaphoreGiveRecursive( xMutex );
           xSemaphoreGiveRecursive( xMutex );
           xSemaphoreGiveRecursive( xMutex );

           // Now the mutex can be taken by other tasks.
       }
       else
       {
           // We could not obtain the mutex and can therefore not access
           // the shared resource safely.
       }
   }
}

Counting Semaphore

– In previous demo, we use binary semaphore to delegate interrupt processing to a task instead of processing it directly in interrupt callback function. In case the task is not finished processing the interrupt event but 2 interrupts occur then we will lose 1 interrupt eventbecausebinary semaphore only store one event (binary semaphore is like a queue with size is 1).- In order to overcome this, we will use counting semaphore where it can store more than 1 events.

/* LED pin */
byte ledPin = 14;
/* pin that is attached to interrupt */
byte interruptPin = 12;
/* hold the state of LED when toggling */
volatile byte state = LOW;
SemaphoreHandle_t xCountingSemaphore;

void setup() {
  Serial.begin(115200);
  pinMode(ledPin, OUTPUT);
  /* set the interrupt pin as input pullup*/
  pinMode(interruptPin, INPUT_PULLUP);
  /* attach interrupt to the pin
  function blink will be invoked when interrupt occurs
  interrupt occurs whenever the pin rising value */
  attachInterrupt(digitalPinToInterrupt(interruptPin), ISRcallback, RISING);
  /* initialize counting semaphore that can store 10 events */
  xCountingSemaphore = xSemaphoreCreateCounting( 10, 0 );
  /* this task will process the interrupt event 
  which is forwarded by interrupt callback function */
  xTaskCreate(
    ISRprocessing,           /* Task function. */
    "ISRprocessing",        /* name of task. */
    1000,                    /* Stack size of task */
    NULL,                     /* parameter of the task */
    4,                        /* priority of the task */
    NULL);  
}

void loop() {
}

/* interrupt function callback */
void ISRcallback() {
  /* */
  BaseType_t xHigherPriorityTaskWoken = pdFALSE;
  /* un-block the interrupt processing task now */
  /* each couple is a blinky cycle 
  we bink 3 times then call this 6 times */
  xSemaphoreGiveFromISR( xCountingSemaphore, &xHigherPriorityTaskWoken );
  xSemaphoreGiveFromISR( xCountingSemaphore, &xHigherPriorityTaskWoken );
  xSemaphoreGiveFromISR( xCountingSemaphore, &xHigherPriorityTaskWoken );
  xSemaphoreGiveFromISR( xCountingSemaphore, &xHigherPriorityTaskWoken );
  xSemaphoreGiveFromISR( xCountingSemaphore, &xHigherPriorityTaskWoken );
  xSemaphoreGiveFromISR( xCountingSemaphore, &xHigherPriorityTaskWoken );
}

/* this function will be invoked when additionalTask was created */
void ISRprocessing( void * parameter )
{
  Serial.println((char *)parameter);
  /* loop forever */
  for(;;){
    /* task move to Block state to wait for interrupt event */
    xSemaphoreTake( xCountingSemaphore, portMAX_DELAY );
    Serial.println("ISRprocessing is running");
    /* toggle the LED now */
    state = !state;
    digitalWrite(ledPin, state);
    /* elay here to see LED blinky */
    delay(1000);
  }
  vTaskDelete( NULL );
}

Critical section

– A critical section is a region of code that need to be protected from any concurrent accesses to change it. The critical section must keep be short because in the critical section most of operations are suspended. If this section is long the suspension time is long too. It affect the behavior of the system.
– In order to implement critical section, there are 2 ways:
+ Call taskENTER_CRITICAL() before enter critical section and call taskEXIT_CRITICAL() after leaving it. Using these function we will disable most of interrupts.
+ Call vTaskSuspendAll() before enter critical section and call xTaskResumeAll() after leaving it. Using these functions we still keep interrupts.
Note: in general the watch dog timer willl be feed by RTOS but we disable scheduler so we have to feed it.

#include <Arduino.h>
 volatile int count = 0;
 static portMUX_TYPE my_mutex;
void highPriorityTask( void * parameter );
void lowPriorityTask( void * parameter );

void setup() {
  Serial.begin(9600);
  /* create Mutex */
  xTaskCreatePinnedToCore(
      lowPriorityTask,           /* Task function. */
      "lowPriorityTask",        /* name of task. */
      10000,                    /* Stack size of task */
      NULL,                     /* parameter of the task */
      1,                        /* priority of the task */
      NULL,1);                    /* Task handle to keep track of created task */
  /* let lowPriorityTask run first */ 
  delay(5);
  /* let lowPriorityTask run first then create highPriorityTask */
  xTaskCreatePinnedToCore(
      highPriorityTask,           /* Task function. */
      "highPriorityTask",        /* name of task. */
      10000,                    /* Stack size of task */
      NULL,                     /* parameter of the task */
      4,                        /* priority of the task */
      NULL,0);                    /* Task handle to keep track of created task */
}

void loop() {

}
void lowPriorityTask( void * parameter )
{
  for(;;){

    //Serial.println("lowPriorityTask lock section");
    /* if using shceduler stopping way then 
    un-comment/comments lines below accordingly */
    //vTaskSuspendAll();
	vPortCPUInitializeMutex(&my_mutex);
	portENTER_CRITICAL(&my_mutex);
    /* stop scheduler until this loop is finished */
    for(count=0; count<40000; count++){
    }
    portEXIT_CRITICAL(&my_mutex);
    //Serial.println("end counting");
    /* we resume the scheduler so highPriorityTask will run again */
  //xTaskResumeAll();
    //Serial.println("lowPriorityTask leave section");

  }
  vTaskDelete( NULL );
}

void highPriorityTask( void * parameter )
{
  for(;;){
	  portENTER_CRITICAL(&my_mutex);
    /* highPriorityTask is resumed, we will check the counter should be 40000 */
    Serial.print("highPriorityTask is running and count is ");
    Serial.println(count);
    /* delay so that lowPriorityTask has chance to run */
    portEXIT_CRITICAL(&my_mutex);
    delay(100);
  }
  vTaskDelete( NULL );
}
Tagged :

Arduino and Esp32 Interrupts (ISR)

Attaching Interrupt to a GPIO Pin

In Arduino IDE, we use a function called attachInterrupt() to set an interrupt on a pin by pin basis. The recommended syntax looks like below.

attachInterrupt(GPIOPin, ISR, Mode);

This function takes three parameters:

GPIOPin – Sets the GPIO pin as an interrupt pin, which tells the ESP32 which pin to monitor.

ISR – Is the name of the function that will be called every time the interrupt is triggered.

Mode – Defines when the interrupt should be triggered. Five constants are predefined as valid values:

LOWTriggers interrupt whenever the pin is LOW
HIGHTriggers interrupt whenever the pin is HIGH
CHANGETriggers interrupt whenever the pin changes value, from HIGH to LOW or LOW to HIGH
FALLINGTriggers interrupt when the pin goes from HIGH to LOW
RISINGTriggers interrupt when the pin goes from LOW to HIGH

Detaching Interrupt from a GPIO Pin

You can optionally call detachInterrupt() function when you no longer want ESP32 to monitor a pin. The recommended syntax looks like below.

detachInterrupt(GPIOPin);

Interrupt Service Routine

Interrupt Service Routine is invoked when an interrupt occurs on any GPIO pin. Its syntax looks like below.

void IRAM_ATTR ISR() {
    Statements;
}

ISRs in ESP32 are special kinds of functions that have some unique rules most other functions do not have.

  • The interrupt service routine must have an execution time as short as possible, because it blocks the normal program execution.
  • Interrupt service routines should have the IRAM_ATTR attribute, according to the ESP32 documentation

What is IRAM_ATTR?

By flagging a piece of code with the IRAM_ATTR attribute we are declaring that the compiled code will be placed in the Internal RAM (IRAM) of the ESP32.
Otherwise the code is placed in the Flash. And flash on the ESP32 is much slower than internal RAM.
If the code we want to run is an interrupt service routine (ISR), we generally want to execute it as quickly as possible. If we had to ‘wait’ for an ISR to load from flash, things would go horribly wrong.

struct Button {
  const uint8_t PIN;
  uint32_t numberKeyPresses;
  bool pressed;
};

Button button1 = {18, 0, false};

void IRAM_ATTR isr() {
  button1.numberKeyPresses += 1;
  button1.pressed = true;
}

void setup() {
  Serial.begin(115200);
  pinMode(button1.PIN, INPUT_PULLUP);
  attachInterrupt(button1.PIN, isr, FALLING);
}

void loop() {
  if (button1.pressed) {
      Serial.printf("Button 1 has been pressed %u times\n", button1.numberKeyPresses);
      button1.pressed = false;
  }

  //Detach Interrupt after 1 Minute
  static uint32_t lastMillis = 0;
  if (millis() - lastMillis > 60000) {
    lastMillis = millis();
    detachInterrupt(button1.PIN);
	Serial.println("Interrupt Detached!");
  }
}

touch interrupt

int threshold = 40;
bool touch1detected = false;
bool touch2detected = false;

void gotTouch(){
 touch1detected = true;
}

void gotTouch1(){
 touch2detected = true;
}

void setup() {
  Serial.begin(115200);
  delay(1000); // give me time to bring up serial monitor
  printf("\n ESP32 Touch Interrupt Test\n");
  touchAttachInterrupt(T2, gotTouch, threshold);
  touchAttachInterrupt(T3, gotTouch1, threshold);
}

void loop(){
  if(touch1detected){
    touch1detected = false;
    Serial.println("Touch 1 detected");
  }
  if(touch2detected){
    touch2detected = false;
    Serial.println("Touch 2 detected");
  }
}

timer interrupt

#include<Arduino.h>

volatile int interrupts;
int totalInterrupts;

hw_timer_t * timer = NULL;
portMUX_TYPE timerMux = portMUX_INITIALIZER_UNLOCKED;


void IRAM_ATTR onTime() {
	portENTER_CRITICAL_ISR(&timerMux);
	interrupts++;
	portEXIT_CRITICAL_ISR(&timerMux);
}


void setup() {

	Serial.begin(9600);

	// Configure Prescaler to 80, as our timer runs @ 80Mhz
	// Giving an output of 80,000,000 / 80 = 1,000,000 ticks / second
	timer = timerBegin(0, 80, true);                
	timerAttachInterrupt(timer, &onTime, true);    
	// Fire Interrupt every 1m ticks, so 1s
	timerAlarmWrite(timer, 1000000, true);			
	timerAlarmEnable(timer);
}
void loop() {
	if (interrupts > 0) {
		portENTER_CRITICAL(&timerMux);
		interrupts--;
		portEXIT_CRITICAL(&timerMux);
		totalInterrupts++;
		Serial.print("totalInterrupts");
		Serial.println(totalInterrupts);
	}
}

note: portEnter_CRITICAL is expand for vTaskEnterCritical