QPainter provides highly optimized functions to do most of the drawing GUI programs require. It can draw everything from simple lines to complex shapes like pies and chords. It can also draw aligned text and pixmaps. Normally, it draws in a “natural” coordinate system, but it can also do view and world transformation. QPainter can operate on any object that inherits the QPaintDevice class.
The common use of QPainter is inside a widget’s paint event: Construct and customize (e.g. set the pen or the brush) the painter. Then draw. Remember to destroy the QPainter object after drawing. For example:
void SimpleExampleWidget::paintEvent(QPaintEvent *)
{
    QPainter painter(this);
    painter.setPen(Qt::blue);
    painter.setFont(QFont("Arial", 30));
    painter.drawText(rect(), Qt::AlignCenter, "Qt");
}
The core functionality of QPainter is drawing, but the class also provide several functions that allows you to customize QPainter’s settings and its rendering quality, and others that enable clipping. In addition you can control how different shapes are merged together by specifying the painter’s composition mode.
The isActive() function indicates whether the painter is active. A painter is activated by the begin() function and the constructor that takes a QPaintDevice argument. The end() function, and the destructor, deactivates it.
Together with the QPaintDevice and QPaintEngine classes, QPainter form the basis for Qt’s paint system. QPainter is the class used to perform drawing operations. QPaintDevice represents a device that can be painted on using a QPainter. QPaintEngine provides the interface that the painter uses to draw onto different types of devices. If the painter is active, device() returns the paint device on which the painter paints, and paintEngine() returns the paint engine that the painter is currently operating on. For more information, see the Paint System.
Settings
There are several settings that you can customize to make QPainter draw according to your preferences:
- font() is the font used for drawing text. If the painter isActive(), you can retrieve information about the currently set font, and its metrics, using the fontInfo() and fontMetrics() functions respectively.
- brush() defines the color or pattern that is used for filling shapes.
- pen() defines the color or stipple that is used for drawing lines or boundaries.
- backgroundMode() defines whether there is a background() or not, i.e it is either Qt::OpaqueMode or Qt::TransparentMode.
- background() only applies when backgroundMode() is Qt::OpaqueMode and pen() is a stipple. In that case, it describes the color of the background pixels in the stipple.
- brushOrigin() defines the origin of the tiled brushes, normally the origin of widget’s background.
- viewport(), window(), worldTransform() make up the painter’s coordinate transformation system. For more information, see the Coordinate Transformations section and the Coordinate System documentation.
- hasClipping() tells whether the painter clips at all. (The paint device clips, too.) If the painter clips, it clips to clipRegion().
- layoutDirection() defines the layout direction used by the painter when drawing text.
- worldMatrixEnabled() tells whether world transformation is enabled.
- viewTransformEnabled() tells whether view transformation is enabled.
Note that some of these settings mirror settings in some paint devices, e.g. QWidget::font(). The QPainter::begin() function (or equivalently the QPainter constructor) copies these attributes from the paint device.
You can at any time save the QPainter’s state by calling the save() function which saves all the available settings on an internal stack. The restore() function pops them back.
void paintEvent(QPaintEvent *pe) override{
   QPainter painter(this);
   QColor color(200,0,0);
   QBrush brush(color,Qt::BrushStyle::FDiagPattern);
   QPen pen(QBrush(color),20,Qt::PenStyle::SolidLine,Qt::PenCapStyle::RoundCap,Qt::PenJoinStyle::RoundJoin);
   painter.setBrush(brush);
   painter.setPen(pen);
   QTransform translate,rotate;
   translate.translate(250,250);
   rotate.rotate(45);
   painter.setTransform(translate);
   painter.setTransform(rotate,true);//rotate*translate*point;
   painter.save();
   painter.drawRect(QRect(-150,-150,300,300));
   painter.drawLine(QLine(-200,200,200,200));
   painter.end();
}
//brush origin
void paintEvent(QPaintEvent *pe) override{
QPainter painter(this);
QColor color(200,0,0);
QBrush brush(color,QPixmap("C:/Users/moham/OneDrive/Pictures/Capture.PNG"));
QPen pen(QBrush(color),10,Qt::PenStyle::SolidLine,Qt::PenCapStyle::RoundCap,Qt::PenJoinStyle::RoundJoin);
painter.setBrush(brush);
painter.setBrushOrigin(100,100);//=brush.setTransform(QTransform::fromTranslate(100,100));
painter.setPen(pen);
painter.drawRect(QRect(100,100,300,300));
}Drawing
QPainter provides functions to draw most primitives: drawPoint(), drawPoints(), drawLine(), drawRect(), drawRoundedRect(), drawEllipse(), drawArc(), drawPie(), drawChord(), drawPolyline(), drawPolygon(), drawConvexPolygon() and drawCubicBezier(). The two convenience functions, drawRects() and drawLines(), draw the given number of rectangles or lines in the given array of QRects or QLines using the current pen and brush.
The QPainter class also provides the fillRect() function which fills the given QRect, with the given QBrush, and the eraseRect() function that erases the area inside the given rectangle.
All of these functions have both integer and floating point versions.
If you need to draw a complex shape, especially if you need to do so repeatedly, consider creating a QPainterPath and drawing it using drawPath().
QPainter also provides the fillPath() function which fills the given QPainterPath with the given QBrush, and the strokePath() function that draws the outline of the given path (i.e. strokes the path).
you can use boundingRect() to get the width and height of text before draw text
Drawing Pixmaps and Images
There are functions to draw pixmaps/images, namely drawPixmap(), drawImage() and drawTiledPixmap(). Both drawPixmap() and drawImage() produce the same result, except that drawPixmap() is faster on-screen while drawImage() may be faster on a QPrinter or other devices.
There is a drawPicture() function that draws the contents of an entire QPicture. The drawPicture() function is the only function that disregards all the painter’s settings as QPicture has its own settings.
Rendering Quality
To get the optimal rendering result using QPainter, you should use the platform independent QImage as paint device; i.e. using QImage will ensure that the result has an identical pixel representation on any platform.
The QPainter class also provides a means of controlling the rendering quality through its RenderHint enum and the support for floating point precision: All the functions for drawing primitives has a floating point version. These are often used in combination with the QPainter::Antialiasing render hint.
The RenderHint enum specifies flags to QPainter that may or may not be respected by any given engine. QPainter::Antialiasing indicates that the engine should antialias edges of primitives if possible, QPainter::TextAntialiasing indicates that the engine should antialias text if possible, and the QPainter::SmoothPixmapTransform indicates that the engine should use a smooth pixmap transformation algorithm.
The renderHints() function returns a flag that specifies the rendering hints that are set for this painter. Use the setRenderHint() function to set or clear the currently set RenderHints.
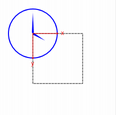
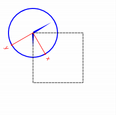
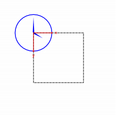
painter.setWindow(-100,-100,1000,1000);//x`=(x*(widget::width()/1000)+100) in other words (0,0)->(-100,-100) (w,h)->(1000,1000)
painter.setViewport(100,100,1000,1000);//it is the oposit of setWindow x`=(x*1000/widget::width()+100) in other words (100,100)->(0,0) (1000,1000)->(w,h)
Coordinate Transformations
Normally, the QPainter operates on the device’s own coordinate system (usually pixels), but QPainter has good support for coordinate transformations.
The most commonly used transformations are scaling, rotation, translation and shearing. Use the scale() function to scale the coordinate system by a given offset, the rotate() function to rotate it clockwise and translate() to translate it (i.e. adding a given offset to the points). You can also twist the coordinate system around the origin using the shear() function.
The setWorldTransform() function can replace or add to the currently set worldTransform(). The resetTransform() function resets any transformations that were made using translate(), scale(), shear(), rotate(), setWorldTransform(), setViewport() and setWindow() functions. The deviceTransform() returns the matrix that transforms from logical coordinates to device coordinates of the platform dependent paint device. The latter function is only needed when using platform painting commands on the platform dependent handle, and the platform does not do transformations nativly.
When drawing with QPainter, we specify points using logical coordinates which then are converted into the physical coordinates of the paint device. The mapping of the logical coordinates to the physical coordinates are handled by QPainter’s combinedTransform(), a combination of viewport() and window() and worldTransform(). The viewport() represents the physical coordinates specifying an arbitrary rectangle, the window() describes the same rectangle in logical coordinates, and the worldTransform() is identical with the transformation matrix.
Clipping
QPainter can clip any drawing operation to a rectangle, a region, or a vector path. The current clip is available using the functions clipRegion() and clipPath(). Whether paths or regions are preferred (faster) depends on the underlying paintEngine(). For example, the QImage paint engine prefers paths while the X11 paint engine prefers regions. Setting a clip is done in the painters logical coordinates.
After QPainter’s clipping, the paint device may also clip. For example, most widgets clip away the pixels used by child widgets, and most printers clip away an area near the edges of the paper. This additional clipping is not reflected by the return value of clipRegion() or hasClipping().
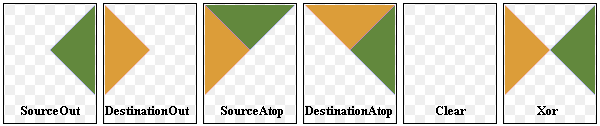
QPainter::CompositionMode setCompositionMode
Defines the modes supported for digital image compositing. Composition modes are used to specify how the pixels in one image, the source, are merged with the pixel in another image, the destination.
Please note that the bitwise raster operation modes, denoted with a RasterOp prefix, are only natively supported in the X11 and raster paint engines. This means that the only way to utilize these modes on the Mac is via a QImage. The RasterOp denoted blend modes are not supported for pens and brushes with alpha components. Also, turning on the QPainter::Antialiasing render hint will effectively disable the RasterOp modes.
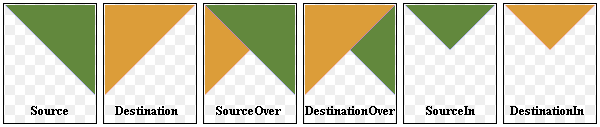
The most common type is SourceOver (often referred to as just alpha blending) where the source pixel is blended on top of the destination pixel in such a way that the alpha component of the source defines the translucency of the pixel.
painter.drawRect(QRect(0,0,300,300));
painter.setCompositionMode(QPainter::CompositionMode::CompositionMode_Difference);
painter.drawRect(QRect(0,0,500,500));
Painting Path
painter path is an object composed of a number of graphical building blocks, such as rectangles, ellipses, lines, and curves. Building blocks can be joined in closed subpaths, for example as a rectangle or an ellipse. A closed path has coinciding start and end points. Or they can exist independently as unclosed subpaths, such as lines and curves.
A QPainterPath object can be used for filling, outlining, and clipping. To generate fillable outlines for a given painter path, use the QPainterPathStroker class. The main advantage of painter paths over normal drawing operations is that complex shapes only need to be created once; then they can be drawn many times using only calls to the QPainter::drawPath() function.
QPainterPath provides a collection of functions that can be used to obtain information about the path and its elements. In addition it is possible to reverse the order of the elements using the toReversed() function. There are also several functions to convert this painter path object into a polygon representation.
Composing a QPainterPath
A QPainterPath object can be constructed as an empty path, with a given start point, or as a copy of another QPainterPath object. Once created, lines and curves can be added to the path using the lineTo(), arcTo(), cubicTo() and quadTo() functions. The lines and curves stretch from the currentPosition() to the position passed as argument.
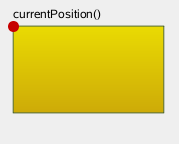
The currentPosition() of the QPainterPath object is always the end position of the last subpath that was added (or the initial start point). Use the moveTo() function to move the currentPosition() without adding a component. The moveTo() function implicitly starts a new subpath, and closes the previous one. Another way of starting a new subpath is to call the closeSubpath() function which closes the current path by adding a line from the currentPosition() back to the path’s start position. Note that the new path will have (0, 0) as its initial currentPosition().
QPainterPath class also provides several convenience functions to add closed subpaths to a painter path: addEllipse(), addPath(), addRect(), addRegion() and addText(). The addPolygon() function adds an unclosed subpath. In fact, these functions are all collections of moveTo(), lineTo() and cubicTo() operations.
In addition, a path can be added to the current path using the connectPath() function. But note that this function will connect the last element of the current path to the first element of given one by adding a line.
The painter path is initially empty when constructed. We first add a rectangle, which is a closed subpath. Then we add two bezier curves which together form a closed subpath even though they are not closed individually. Finally we draw the entire path. The path is filled using the default fill rule, Qt::OddEvenFill. Qt provides two methods for filling paths:
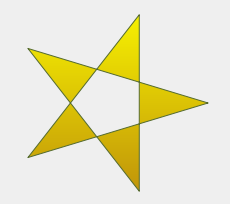
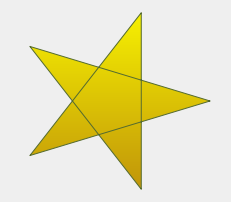
See the Qt::FillRule documentation for the definition of the rules. A painter path’s currently set fill rule can be retrieved using the fillRule() function, and altered using the setFillRule() function.
QPainterPath Information
The QPainterPath class provides a collection of functions that returns information about the path and its elements.
The currentPosition() function returns the end point of the last subpath that was added (or the initial start point). The elementAt() function can be used to retrieve the various subpath elements, the number of elements can be retrieved using the elementCount() function, and the isEmpty() function tells whether this QPainterPath object contains any elements at all.
The controlPointRect() function returns the rectangle containing all the points and control points in this path. This function is significantly faster to compute than the exact boundingRect() which returns the bounding rectangle of this painter path with floating point precision.
Finally, QPainterPath provides the contains() function which can be used to determine whether a given point or rectangle is inside the path, and the intersects() function which determines if any of the points inside a given rectangle also are inside this path.
QPainterPath Conversion
For compatibility reasons, it might be required to simplify the representation of a painter path: QPainterPath provides the toFillPolygon(), toFillPolygons() and toSubpathPolygons() functions which convert the painter path into a polygon. The toFillPolygon() returns the painter path as one single polygon, while the two latter functions return a list of polygons.
The toFillPolygons() and toSubpathPolygons() functions are provided because it is usually faster to draw several small polygons than to draw one large polygon, even though the total number of points drawn is the same. The difference between the two is the number of polygons they return: The toSubpathPolygons() creates one polygon for each subpath regardless of intersecting subpaths (i.e. overlapping bounding rectangles), while the toFillPolygons() functions creates only one polygon for overlapping subpaths.
The toFillPolygon() and toFillPolygons() functions first convert all the subpaths to polygons, then uses a rewinding technique to make sure that overlapping subpaths can be filled using the correct fill rule. Note that rewinding inserts additional lines in the polygon so the outline of the fill polygon does not match the outline of the path.
QLinearGradient myGradient;
QPen myPen;
QRectF boundingRectangle;

QPainterPath myPath;
myPath.addEllipse(boundingRectangle);

QPainter painter(this);
painter.setBrush(myGradient);
painter.setPen(myPen);
painter.drawPath(myPath);
QPainterPath path;
path.addRect(20, 20, 60, 60);
path.moveTo(0, 0);
path.cubicTo(99, 0, 50, 50, 99, 99);
path.cubicTo(0, 99, 50, 50, 0, 0);
QPainter painter(this);
painter.fillRect(0, 0, 100, 100, Qt::white);
painter.setPen(QPen(QColor(79, 106, 25), 1, Qt::SolidLine,
Qt::FlatCap, Qt::MiterJoin));
painter.setBrush(QColor(122, 163, 39));
painter.drawPath(path);QLinearGradient myGradient;
QPen myPen;
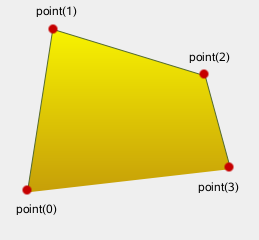
QPolygonF myPolygon;
QPainterPath myPath;
myPath.addPolygon(myPolygon);
QPainter painter(this);
painter.setBrush(myGradient);
painter.setPen(myPen);
painter.drawPath(myPath);QLinearGradient myGradient;
QPen myPen;
QRectF myRectangle;
QPainterPath myPath;
myPath.addRect(myRectangle);
QPainter painter(this);
painter.setBrush(myGradient);
painter.setPen(myPen);
painter.drawPath(myPath);QLinearGradient myGradient;
QPen myPen;
QFont myFont;
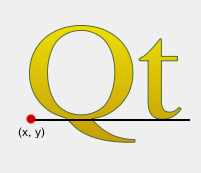
QPointF baseline(x, y);
QPainterPath myPath;
myPath.addText(baseline, myFont, tr("Qt"));
QPainter painter(this);
painter.setBrush(myGradient);
painter.setPen(myPen);
painter.drawPath(myPath);QLinearGradient myGradient;
QPen myPen;
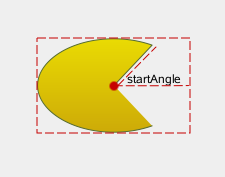
QPointF center, startPoint;
QPainterPath myPath;
myPath.moveTo(center);
myPath.arcTo(boundingRect, startAngle,
sweepLength);
QPainter painter(this);
painter.setBrush(myGradient);
painter.setPen(myPen);
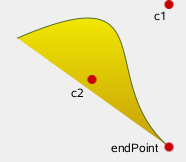
painter.drawPath(myPath);QLinearGradient myGradient;
QPen myPen;
QPainterPath myPath;
myPath.cubicTo(c1, c2, endPoint);
QPainter painter(this);
painter.setBrush(myGradient);
painter.setPen(myPen);
painter.drawPath(myPath);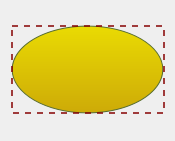 |  |
 |  |
 |  |
 |