As in one-dimensional signals, images also can be filtered with various low-pass filters (LPF), high-pass filters (HPF), etc. LPF helps in removing noise, blurring images, etc. HPF filters help in finding edges in images OpenCV provides a function cv.filter2D() to convolve a kernel with an image.
Normalized Box Filter
To perform a smoothing operation we will apply a filter to our image. The most common type of filters are linear, in which an output pixel’s value .
kernel = Mat::ones(5, 5, CV_8UC);/25
dst = filter2D(img,-1,kernel)
//or
blur = blur(img,dest,5)

// or you can use boxFilter
filter2D(InputArray src, OutputArray dst, int ddepth, InputArray kernel, Point anchor=Point(-1,-1), double delta=0, int borderType=BORDER_DEFAULT )
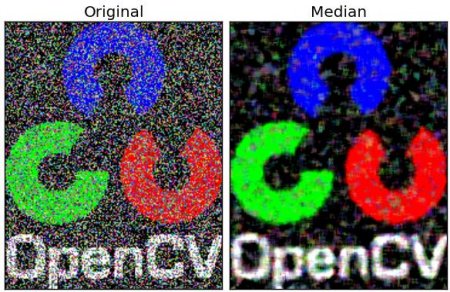
Median Filter
The median filter run through each element of the signal (in this case the image) and replace each pixel with the median of its neighboring pixels
medianBlur ( src, dst, i );//i is kernal size
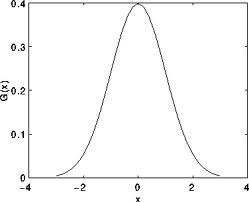
Gaussian Filter
Probably the most useful filter (although not the fastest). Gaussian filtering is done by convolving each point in the input array with a Gaussian kernel and then summing them all to produce the output array.
Just to make the picture clearer, remember how a 1D Gaussian
Assuming that an image is 1D, you can notice that the pixel located in the middle would have the biggest weight. The weight of its neighbors decreases as the spatial distance between them and the center pixel increases.
Gaussian Filter Generation
void FilterCreation(double GKernel[][5])
{
    // intialising standard deviation to 1.0
    double sigma = 1.0;
    double r, s = 2.0 * sigma * sigma;

    // sum is for normalization
    double sum = 0.0;

    // generating 5x5 kernel
    for (int x = -2; x <= 2; x++) {
        for (int y = -2; y <= 2; y++) {
            r = sqrt(x * x + y * y);
            GKernel[x + 2][y + 2] = (exp(-(r * r) / s)) / (M_PI * s);
            sum += GKernel[x + 2][y + 2];
        }
    }

    // normalising the Kernel
    for (int i = 0; i < 5; ++i)
        for (int j = 0; j < 5; ++j)
            GKernel[i][j] /= sum;
}
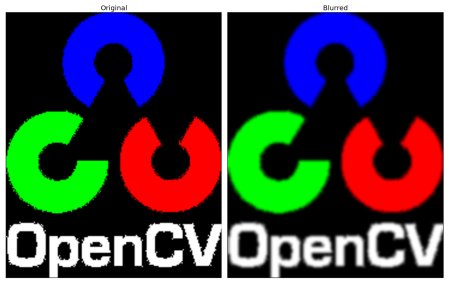
So far, we have explained some filters which main goal is to smooth an input image. However, sometimes the filters do not only dissolve the noise, but also smooth away the edges. To avoid this (at certain extent at least), we can use a bilateral filter.
In an analogous way as the Gaussian filter, the bilateral filter also considers the neighboring pixels with weights assigned to each of them. These weights have two components, the first of which is the same weighting used by the Gaussian filter. The second component takes into account the difference in intensity between the neighboring pixels and the evaluated one.
bilateralFilter(InputArray src, OutputArray dst, int d, double sigmaColor, double sigmaSpace, int borderType=BORDER_DEFAULT )
Parameters:
src – Source 8-bit or floating-point, 1-channel or 3-channel image.
dst – Destination image of the same size and type as src .
d – Diameter of each pixel neighborhood that is used during filtering. If it is non-positive, it is computed from sigmaSpace .
sigmaColor – Filter sigma in the color space. A larger value of the parameter means that farther colors within the pixel neighborhood (see sigmaSpace ) will be mixed together, resulting in larger areas of semi-equal color.
sigmaSpace – Filter sigma in the coordinate space. A larger value of the parameter means that farther pixels will influence each other as long as their colors are close enough (see sigmaColor ). When d>0 , it specifies the neighborhood size regardless of sigmaSpace . Otherwise, d is proportional to sigmaSpace .
in modern c++ the memory of returned object or value is saved to use an extern of function so there is no need to call copy or move constructor
A fun(){
    A a(2);
    cout<<&a<<endl;
    return a;
}
int main(int argc,const char *argv[]){
    A a=fun();
    cout<<&a<<endl;//it have same address of object inside fun function
    return 0;
}
Any single channel array should belong to one of following data types.
CV_8U – 8 bit unsigned integer
CV_8S – 8 bit signed integer
CV_16U – 16 bit unsigned integer
CV_16S – 16 bit signed integer
CV_32S – 32 bit signed integer
CV_32F – 32 bit floating point number
CV_64F – 64 bit float floating point number
We can define all of above data types for multi channel arrays. OpenCV supports up to 512 channels. Here I am going to show you how to define CV_8U data type for multi channel arrays.
CV_8UC1 – Single channel array with 8 bit unsigned integers which is exactly same as CV_8U
CV_8UC2 – 2 channel array with 8 bit unsigned integers
CV_8UC3 – 3 channel array with 8 bit unsigned integers
CV_8UC4 – 4 channel array with 8 bit unsigned integers
CV_8UC(n) – n channel array with 8 bit unsigned integers (n can be from 1 to 512) )
The class Mat represents an n-dimensional dense numerical single-channel or multi-channel array. It can be used to store real or complex-valued vectors and matrices, grayscale or color images, voxel volumes, vector fields, point clouds, tensors, histograms . M.step[i] >= M.step[i+1]
//3 channels
 //image depth of 8 bits
 //800 x 600 of resolution (800 wide and 600 high)
 //each pixels initialized to the value of (100, 250, 30) for Blue, Green and Red planes respectively.
 Mat image(600, 800, CV_8UC3, Scalar(100, 250, 30));
Mat ()

Mat (int rows, int cols, int type)

Mat (Size size, int type)

Mat (int rows, int cols, int type, const Scalar &s)

Mat (Size size, int type, const Scalar &s)

Mat (int ndims, const int *sizes, int type)

Mat (const std::vector< int > &sizes, int type)

Mat (int ndims, const int *sizes, int type, const Scalar &s)//multi dimensional mat

Mat (const std::vector< int > &sizes, int type, const Scalar &s)//multi dimensional mat

Mat (const Mat &m)//

Mat (int rows, int cols, int type, void *data, size_t step=AUTO_STEP)

Mat (const Mat &m, const Rect &roi)//Mat 	operator() (const Rect &roi) const

Mat (const Mat &m, const Range *ranges)//Mat 	operator() (const Range &roi) const
Use a copy constructor or assignment operator where there can be an array or expression on the right side (see below). As noted in the introduction, the array assignment is an O(1) operation because it only copies the header and increases the reference counter. The Mat::clone() method can be used to get a full (deep) copy of the array when you need it.
// make a 7x7 complex matrix filled with 1+3j.
Mat M(7,7,CV_32FC2,Scalar(1,3));
// and now turn M to a 100x60 15-channel 8-bit matrix.
// The old content will be deallocated
M.create(100,60,CV_8UC(15));
// create a 100x100x100 8-bit array
int sz[] = {100, 100, 100};
Mat bigCube(3, sz, CV_8U, Scalar::all(0));
// add the 5-th row, multiplied by 3 to the 3rd row
M.row(3) = M.row(3) + M.row(5)*3;
// now copy the 7-th column to the 1-st column
// M.col(1) = M.col(7); // this will not work
Mat M1 = M.col(1);
M.col(7).copyTo(M1);
// create a new 320x240 image
Mat img(Size(320,240),CV_8UC3);
// select a ROI
Mat roi(img, Rect(10,10,100,100));
// fill the ROI with (0,255,0) (which is green in RGB space);
// the original 320x240 image will be modified
roi = Scalar(0,255,0);
//locateROI
Mat A = Mat::eye(10, 10, CV_32S);
// extracts A columns, 1 (inclusive) to 3 (exclusive).
Mat B = A(Range::all(), Range(1, 3));
// extracts B rows, 5 (inclusive) to 9 (exclusive).
// that is, C \~ A(Range(5, 9), Range(1, 3))
Mat C = B(Range(5, 9), Range::all());
Size size; Point ofs;
C.locateROI(size, ofs);
// size will be (width=10,height=10) and the ofs will be (x=1, y=5)
double m[3][3] = {{a, b, c}, {d, e, f}, {g, h, i}};
Mat M = Mat(3, 3, CV_64F, m).inv();
//Use MATLAB-style array initializers, zeros(), ones(), eye()
// create a double-precision identity matrix and add it to M.
M += Mat::eye(M.rows, M.cols, CV_64F);
// create a 3x3 double-precision identity matrix
Mat M = (Mat_<double>(3,3) << 1, 0, 0, 0, 1, 0, 0, 0, 1);
If you want to release the data pointed by a array header before the array destructor is called, use Mat::release().
// you can access the element Mij of a 2-dimensional array as:
M.at<double>(i,j) += 1.f;
//rows ptr
// compute sum of positive matrix elements
// (assuming that M is a double-precision matrix)
double sum=0;
for(int i = 0; i < M.rows; i++)
{
    const double* Mi = M.ptr<double>(i);
    for(int j = 0; j < M.cols; j++)
        sum += std::max(Mi[j], 0.);
}
matrix iterator The matrix iterators are random-access iterators, so they can be passed to any STL algorithm, including std::sort().
// compute sum of positive matrix elements, iterator-based variant
double sum=0;
MatConstIterator_<double> it = M.begin<double>(), it_end = M.end<double>();
for(; it != it_end; ++it)
    sum += std::max(*it, 0.);
//rows and cols and at
Mat H(100, 100, CV_64F);
for(int i = 0; i < H.rows; i++)
    for(int j = 0; j < H.cols; j++)
        H.at<double>(i,j)=1./(i+j+1);
// alternative implementation of Mat::isContinuous()
bool myCheckMatContinuity(const Mat& m)
{
    //return (m.flags & Mat::CONTINUOUS_FLAG) != 0;
    return m.rows == 1 || m.step == m.cols*m.elemSize();
}
//foreach
// Creating 3D matrix (255 x 255 x 255) typed uint8_t
// and initialize all elements by the value which equals elements position.
// i.e. pixels (x,y,z) = (1,2,3) is (b,g,r) = (1,2,3).
int sizes[] = { 255, 255, 255 };
typedef cv::Point3_<uint8_t> Pixel;
Mat_<Pixel> image = Mat::zeros(3, sizes, CV_8UC3);
image.forEach<Pixel>([&](Pixel& pixel, const int position[]) -> void {
    pixel.x = position[0];
    pixel.y = position[1];
    pixel.z = position[2];
});
//reshape
std::vector<Point3f> vec;
...
Mat pointMat = Mat(vec). // convert vector to Mat, O(1) operation
                  reshape(1). // make Nx3 1-channel matrix out of Nx1 3-channel.
                              // Also, an O(1) operation
                     t(); // finally, transpose the Nx3 matrix.
                          // This involves copying all the elements
clone() : The method creates a full copy of the array .
copyTo(OutputArray) : The method copies the matrix data to another matrix . Before copying the data, the method invokes : ceate(size,type) .
Mat row(int y) const : The method makes a new header for the specified matrix row and returns it .
Mat cv::Mat::rowRange( int startrow,int endrow) const : Creates a matrix header for the specified row span. startrow is inclusive and endrow is exclusive .
same way with col(int) and colRange(int,int)
isSubmatrix() : return true if the matrix is submatrix of other matrix .
isContinuous(): m.rows == 1 || m.step == m.cols*m.elemSize() so supmatrix is not continues because m.step is the full row elements size but m.cols is sub of original .
adjustROI(int dtop, int dbottom, int dleft, int dright): Adjusts a submatrix size and position within the parent matrix.
locateROI(Size,Point): save size of full matrix and offset x and y to point .
reshape(int channels,dimensions) : Changes the shape and/or the number of channels of a 2D matrix without copying the data.
This is a list of implemented matrix operations that can be combined in arbitrary complex expressions (here A, B stand for matrices ( Mat ), s for a scalar ( Scalar ), alpha for a real-valued scalar ( double )):
Addition, subtraction, negation: A+B, A-B, A+s, A-s, s+A, s-A, -A
Scaling: A*alpha
Per-element multiplication and division: A.mul(B), A/B, alpha/A
Matrix multiplication: A*B
Transposition: A.t() (means AT)
Matrix inversion and pseudo-inversion, solving linear systems and least-squares problems: A.inv([method]) (~ A<sup>-1</sup>), A.inv([method])*B (~ X: AX=B)
Comparison: A cmpop B, A cmpop alpha, alpha cmpop A, where cmpop is one of >, >=, ==, !=, <=, <. The result of comparison is an 8-bit single channel mask whose elements are set to 255 (if the particular element or pair of elements satisfy the condition) or 0.
Bitwise logical operations: A logicop B, A logicop s, s logicop A, ~A, where logicop is one of &, |, ^.
Any function of matrix or matrices and scalars that returns a matrix or a scalar, such as norm, mean, sum, countNonZero, trace, determinant, repeat, and others.
Matrix initializers ( Mat::eye(), Mat::zeros(), Mat::ones() ), matrix comma-separated initializers, matrix constructors and operators that extract sub-matrices (see Mat description).
Mat_<destination_type>() constructors to cast the result to the proper type.
Mat m1= Mat::eye(2,3, CV_32F);
Mat m2= Mat::ones(3,2, CV_32F);
// Scalar by matrix
cout << "nm1.*2n" << m1*2 << endl;
// matrix per element multiplication
cout << "n(m1+2).*(m1+3)n" << (m1+1).mul(m1+3) << endl;
// Matrix multiplication
cout << "nm1*m2n" << m1*m2 << endl;
QImage to Mat and Opposit
image= QImage("C:/Users/malabdali/Pictures/elementary linear algebra.png");
qDebug()<<image.depth();//32 bits depth
m=Mat(image.height(),image.width(),CV_8UC(4),image.bits());
qDebug()<<m.step[0]<<m.step[1]<<" = "<<m.elemSize()<<m.size[1]<<m.type();//2380 number of bytes for row,4 number of bytes for pixel
Mat m(image.height(),image.width(),CV_8UC(4),image.bits());
Vec<uint8_t,4> v=m.at<Vec<uint8_t,4>>(200,200);
qDebug()<<v[0]<<v[1]<<v[2];
how to make assignment by your self
Mat& ScanImageAndReduceC(Mat& I, const uchar* const table)
{
    // accept only char type matrices
    CV_Assert(I.depth() == CV_8U);
    int channels = I.channels();
    int nRows = I.rows;
    int nCols = I.cols * channels;
    if (I.isContinuous())
    {
        nCols *= nRows;
        nRows = 1;
    }
    int i,j;
    uchar* p;
    for( i = 0; i < nRows; ++i)
    {
        p = I.ptr<uchar>(i);
        for ( j = 0; j < nCols; ++j)
        {
            p[j] = table[p[j]];
        }
    }
    return I;
}
or use iterator
Mat& ScanImageAndReduceIterator(Mat& I, const uchar* const table)
{
    // accept only char type matrices
    CV_Assert(I.depth() == CV_8U);
    const int channels = I.channels();
    switch(channels)
    {
    case 1:
        {
            MatIterator_<uchar> it, end;
            for( it = I.begin<uchar>(), end = I.end<uchar>(); it != end; ++it)
                *it = table[*it];
            break;
        }
    case 3:
        {
            MatIterator_<Vec3b> it, end;
            for( it = I.begin<Vec3b>(), end = I.end<Vec3b>(); it != end; ++it)
            {
                (*it)[0] = table[(*it)[0]];
                (*it)[1] = table[(*it)[1]];
                (*it)[2] = table[(*it)[2]];
            }
        }
    }
    return I;
}
on the fly address
Mat& ScanImageAndReduceRandomAccess(Mat& I, const uchar* const table)
{
    // accept only char type matrices
    CV_Assert(I.depth() == CV_8U);
    const int channels = I.channels();
    switch(channels)
    {
    case 1:
        {
            for( int i = 0; i < I.rows; ++i)
                for( int j = 0; j < I.cols; ++j )
                    I.at<uchar>(i,j) = table[I.at<uchar>(i,j)];
            break;
        }
    case 3:
        {
         Mat_<Vec3b> _I = I;
         for( int i = 0; i < I.rows; ++i)
            for( int j = 0; j < I.cols; ++j )
               {
                   _I(i,j)[0] = table[_I(i,j)[0]];
                   _I(i,j)[1] = table[_I(i,j)[1]];
                   _I(i,j)[2] = table[_I(i,j)[2]];
            }
         I = _I;
         break;
        }
    }
    return I;
}
lookup table modification cv::LUT() Performs a look-up table transform of an array. The function LUT fills the output array with values from the look-up table. Indices of the entries are taken from the input array. That is, the function processes each element of src as follows:dst(I)←lut(src(I) )
src
input array of 8-bit elements.
lut
look-up table of 256 elements; in case of multi-channel input array, the table should either have a single channel (in this case the same table is used for all channels) or the same number of channels as in the input array.
dst
output array of the same size and number of channels as src, and the same depth as lut.
Mat lookUpTable(1, 256, CV_8U);
uchar* p = lookUpTable.ptr();
for( int i = 0; i < 256; ++i)
        p[i] = table[i];
LUT(I, lookUpTable, J);
sharpen image example (filter2d or .ptr<>(i,j))
#include <opencv2/imgcodecs.hpp>
#include <opencv2/highgui.hpp>
#include <opencv2/imgproc.hpp>
#include <iostream>
using namespace std;
using namespace cv;
static void help(char* progName)
{
    cout << endl
        <<  "This program shows how to filter images with mask: the write it yourself and the"
        << "filter2d way. " << endl
        <<  "Usage:"                                                                        << endl
        << progName << " [image_path -- default lena.jpg] [G -- grayscale] "        << endl << endl;
}
void Sharpen(const Mat& myImage,Mat& Result);
int main( int argc, char* argv[])
{
    help(argv[0]);
    const char* filename = argc >=2 ? argv[1] : "lena.jpg";
    Mat src, dst0, dst1;
    if (argc >= 3 && !strcmp("G", argv[2]))
        src = imread( samples::findFile( filename ), IMREAD_GRAYSCALE);
    else
        src = imread( samples::findFile( filename ), IMREAD_COLOR);
    if (src.empty())
    {
        cerr << "Can't open image ["  << filename << "]" << endl;
        return EXIT_FAILURE;
    }
    namedWindow("Input", WINDOW_AUTOSIZE);
    namedWindow("Output", WINDOW_AUTOSIZE);
    imshow( "Input", src );
    double t = (double)getTickCount();
    Sharpen( src, dst0 );
    t = ((double)getTickCount() - t)/getTickFrequency();
    cout << "Hand written function time passed in seconds: " << t << endl;
    imshow( "Output", dst0 );
    waitKey();
    Mat kernel = (Mat_<char>(3,3) <<  0, -1,  0,
                                   -1,  5, -1,
                                    0, -1,  0);
    t = (double)getTickCount();
    filter2D( src, dst1, src.depth(), kernel );
    t = ((double)getTickCount() - t)/getTickFrequency();
    cout << "Built-in filter2D time passed in seconds:     " << t << endl;
    imshow( "Output", dst1 );
    waitKey();
    return EXIT_SUCCESS;
}
void Sharpen(const Mat& myImage,Mat& Result)
{
    CV_Assert(myImage.depth() == CV_8U);  // accept only uchar images
    const int nChannels = myImage.channels();
    Result.create(myImage.size(),myImage.type());
    for(int j = 1 ; j < myImage.rows-1; ++j)
    {
        const uchar* previous = myImage.ptr<uchar>(j - 1);
        const uchar* current  = myImage.ptr<uchar>(j    );
        const uchar* next     = myImage.ptr<uchar>(j + 1);
        uchar* output = Result.ptr<uchar>(j);
        for(int i= nChannels;i < nChannels*(myImage.cols-1); ++i)
        {
            *output++ = saturate_cast<uchar>(5*current[i]
                         -current[i-nChannels] - current[i+nChannels] - previous[i] - next[i]);
        }
    }
    Result.row(0).setTo(Scalar(0));
    Result.row(Result.rows-1).setTo(Scalar(0));
    Result.col(0).setTo(Scalar(0));
    Result.col(Result.cols-1).setTo(Scalar(0));
}
QPainter provides highly optimized functions to do most of the drawing GUI programs require. It can draw everything from simple lines to complex shapes like pies and chords. It can also draw aligned text and pixmaps. Normally, it draws in a “natural” coordinate system, but it can also do view and world transformation. QPainter can operate on any object that inherits the QPaintDevice class.
The common use of QPainter is inside a widget’s paint event: Construct and customize (e.g. set the pen or the brush) the painter. Then draw. Remember to destroy the QPainter object after drawing. For example:
The core functionality of QPainter is drawing, but the class also provide several functions that allows you to customize QPainter’s settings and its rendering quality, and others that enable clipping. In addition you can control how different shapes are merged together by specifying the painter’s composition mode.
The isActive() function indicates whether the painter is active. A painter is activated by the begin() function and the constructor that takes a QPaintDevice argument. The end() function, and the destructor, deactivates it.
Together with the QPaintDevice and QPaintEngine classes, QPainter form the basis for Qt’s paint system. QPainter is the class used to perform drawing operations. QPaintDevice represents a device that can be painted on using a QPainter. QPaintEngine provides the interface that the painter uses to draw onto different types of devices. If the painter is active, device() returns the paint device on which the painter paints, and paintEngine() returns the paint engine that the painter is currently operating on. For more information, see the Paint System.
Settings
There are several settings that you can customize to make QPainter draw according to your preferences:
font() is the font used for drawing text. If the painter isActive(), you can retrieve information about the currently set font, and its metrics, using the fontInfo() and fontMetrics() functions respectively.
brush() defines the color or pattern that is used for filling shapes.
pen() defines the color or stipple that is used for drawing lines or boundaries.
background() only applies when backgroundMode() is Qt::OpaqueMode and pen() is a stipple. In that case, it describes the color of the background pixels in the stipple.
brushOrigin() defines the origin of the tiled brushes, normally the origin of widget’s background.
Note that some of these settings mirror settings in some paint devices, e.g. QWidget::font(). The QPainter::begin() function (or equivalently the QPainter constructor) copies these attributes from the paint device.
You can at any time save the QPainter’s state by calling the save() function which saves all the available settings on an internal stack. The restore() function pops them back.
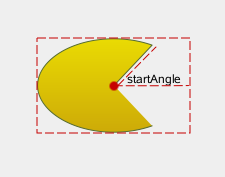
QPainter provides functions to draw most primitives: drawPoint(), drawPoints(), drawLine(), drawRect(), drawRoundedRect(), drawEllipse(), drawArc(), drawPie(), drawChord(), drawPolyline(), drawPolygon(), drawConvexPolygon() and drawCubicBezier(). The two convenience functions, drawRects() and drawLines(), draw the given number of rectangles or lines in the given array of QRects or QLines using the current pen and brush. The QPainter class also provides the fillRect() function which fills the given QRect, with the given QBrush, and the eraseRect() function that erases the area inside the given rectangle. All of these functions have both integer and floating point versions. If you need to draw a complex shape, especially if you need to do so repeatedly, consider creating a QPainterPath and drawing it using drawPath(). QPainter also provides the fillPath() function which fills the given QPainterPath with the given QBrush, and the strokePath() function that draws the outline of the given path (i.e. strokes the path). you can use boundingRect() to get the width and height of text before draw text
Drawing Pixmaps and Images
There are functions to draw pixmaps/images, namely drawPixmap(), drawImage() and drawTiledPixmap(). Both drawPixmap() and drawImage() produce the same result, except that drawPixmap() is faster on-screen while drawImage() may be faster on a QPrinter or other devices. There is a drawPicture() function that draws the contents of an entire QPicture. The drawPicture() function is the only function that disregards all the painter’s settings as QPicture has its own settings.
Rendering Quality
To get the optimal rendering result using QPainter, you should use the platform independent QImage as paint device; i.e. using QImage will ensure that the result has an identical pixel representation on any platform. The QPainter class also provides a means of controlling the rendering quality through its RenderHint enum and the support for floating point precision: All the functions for drawing primitives has a floating point version. These are often used in combination with the QPainter::Antialiasing render hint. The RenderHint enum specifies flags to QPainter that may or may not be respected by any given engine. QPainter::Antialiasing indicates that the engine should antialias edges of primitives if possible, QPainter::TextAntialiasing indicates that the engine should antialias text if possible, and the QPainter::SmoothPixmapTransform indicates that the engine should use a smooth pixmap transformation algorithm. The renderHints() function returns a flag that specifies the rendering hints that are set for this painter. Use the setRenderHint() function to set or clear the currently set RenderHints.
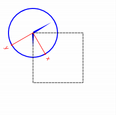
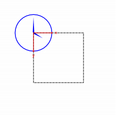
painter.setWindow(-100,-100,1000,1000);//x`=(x*(widget::width()/1000)+100) in other words (0,0)->(-100,-100) (w,h)->(1000,1000)
painter.setViewport(100,100,1000,1000);//it is the oposit of setWindow x`=(x*1000/widget::width()+100) in other words (100,100)->(0,0) (1000,1000)->(w,h)
Coordinate Transformations
Normally, the QPainter operates on the device’s own coordinate system (usually pixels), but QPainter has good support for coordinate transformations.
The most commonly used transformations are scaling, rotation, translation and shearing. Use the scale() function to scale the coordinate system by a given offset, the rotate() function to rotate it clockwise and translate() to translate it (i.e. adding a given offset to the points). You can also twist the coordinate system around the origin using the shear() function.
The setWorldTransform() function can replace or add to the currently set worldTransform(). The resetTransform() function resets any transformations that were made using translate(), scale(), shear(), rotate(), setWorldTransform(), setViewport() and setWindow() functions. The deviceTransform() returns the matrix that transforms from logical coordinates to device coordinates of the platform dependent paint device. The latter function is only needed when using platform painting commands on the platform dependent handle, and the platform does not do transformations nativly. When drawing with QPainter, we specify points using logical coordinates which then are converted into the physical coordinates of the paint device. The mapping of the logical coordinates to the physical coordinates are handled by QPainter’s combinedTransform(), a combination of viewport() and window() and worldTransform(). The viewport() represents the physical coordinates specifying an arbitrary rectangle, the window() describes the same rectangle in logical coordinates, and the worldTransform() is identical with the transformation matrix.
Clipping
QPainter can clip any drawing operation to a rectangle, a region, or a vector path. The current clip is available using the functions clipRegion() and clipPath(). Whether paths or regions are preferred (faster) depends on the underlying paintEngine(). For example, the QImage paint engine prefers paths while the X11 paint engine prefers regions. Setting a clip is done in the painters logical coordinates. After QPainter’s clipping, the paint device may also clip. For example, most widgets clip away the pixels used by child widgets, and most printers clip away an area near the edges of the paper. This additional clipping is not reflected by the return value of clipRegion() or hasClipping().
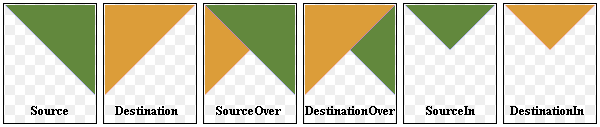
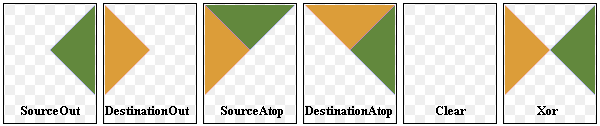
Defines the modes supported for digital image compositing. Composition modes are used to specify how the pixels in one image, the source, are merged with the pixel in another image, the destination. Please note that the bitwise raster operation modes, denoted with a RasterOp prefix, are only natively supported in the X11 and raster paint engines. This means that the only way to utilize these modes on the Mac is via a QImage. The RasterOp denoted blend modes are not supported for pens and brushes with alpha components. Also, turning on the QPainter::Antialiasing render hint will effectively disable the RasterOp modes.
The most common type is SourceOver (often referred to as just alpha blending) where the source pixel is blended on top of the destination pixel in such a way that the alpha component of the source defines the translucency of the pixel.
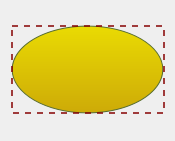
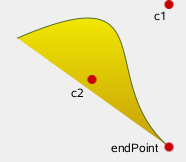
painter path is an object composed of a number of graphical building blocks, such as rectangles, ellipses, lines, and curves. Building blocks can be joined in closed subpaths, for example as a rectangle or an ellipse. A closed path has coinciding start and end points. Or they can exist independently as unclosed subpaths, such as lines and curves.
A QPainterPath object can be used for filling, outlining, and clipping. To generate fillable outlines for a given painter path, use the QPainterPathStroker class. The main advantage of painter paths over normal drawing operations is that complex shapes only need to be created once; then they can be drawn many times using only calls to the QPainter::drawPath() function.
QPainterPath provides a collection of functions that can be used to obtain information about the path and its elements. In addition it is possible to reverse the order of the elements using the toReversed() function. There are also several functions to convert this painter path object into a polygon representation.
Composing a QPainterPath
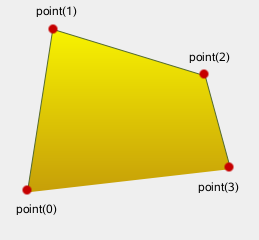
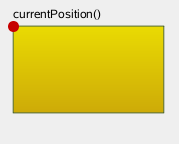
A QPainterPath object can be constructed as an empty path, with a given start point, or as a copy of another QPainterPath object. Once created, lines and curves can be added to the path using the lineTo(), arcTo(), cubicTo() and quadTo() functions. The lines and curves stretch from the currentPosition() to the position passed as argument.
The currentPosition() of the QPainterPath object is always the end position of the last subpath that was added (or the initial start point). Use the moveTo() function to move the currentPosition() without adding a component. The moveTo() function implicitly starts a new subpath, and closes the previous one. Another way of starting a new subpath is to call the closeSubpath() function which closes the current path by adding a line from the currentPosition() back to the path’s start position. Note that the new path will have (0, 0) as its initial currentPosition().
QPainterPath class also provides several convenience functions to add closed subpaths to a painter path: addEllipse(), addPath(), addRect(), addRegion() and addText(). The addPolygon() function adds an unclosed subpath. In fact, these functions are all collections of moveTo(), lineTo() and cubicTo() operations.
In addition, a path can be added to the current path using the connectPath() function. But note that this function will connect the last element of the current path to the first element of given one by adding a line.
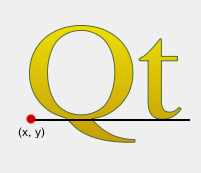
The painter path is initially empty when constructed. We first add a rectangle, which is a closed subpath. Then we add two bezier curves which together form a closed subpath even though they are not closed individually. Finally we draw the entire path. The path is filled using the default fill rule, Qt::OddEvenFill. Qt provides two methods for filling paths:
See the Qt::FillRule documentation for the definition of the rules. A painter path’s currently set fill rule can be retrieved using the fillRule() function, and altered using the setFillRule() function.
QPainterPath Information
The QPainterPath class provides a collection of functions that returns information about the path and its elements. The currentPosition() function returns the end point of the last subpath that was added (or the initial start point). The elementAt() function can be used to retrieve the various subpath elements, the number of elements can be retrieved using the elementCount() function, and the isEmpty() function tells whether this QPainterPath object contains any elements at all. The controlPointRect() function returns the rectangle containing all the points and control points in this path. This function is significantly faster to compute than the exact boundingRect() which returns the bounding rectangle of this painter path with floating point precision. Finally, QPainterPath provides the contains() function which can be used to determine whether a given point or rectangle is inside the path, and the intersects() function which determines if any of the points inside a given rectangle also are inside this path.
QPainterPath Conversion
For compatibility reasons, it might be required to simplify the representation of a painter path: QPainterPath provides the toFillPolygon(), toFillPolygons() and toSubpathPolygons() functions which convert the painter path into a polygon. The toFillPolygon() returns the painter path as one single polygon, while the two latter functions return a list of polygons. The toFillPolygons() and toSubpathPolygons() functions are provided because it is usually faster to draw several small polygons than to draw one large polygon, even though the total number of points drawn is the same. The difference between the two is the number of polygons they return: The toSubpathPolygons() creates one polygon for each subpath regardless of intersecting subpaths (i.e. overlapping bounding rectangles), while the toFillPolygons() functions creates only one polygon for overlapping subpaths. The toFillPolygon() and toFillPolygons() functions first convert all the subpaths to polygons, then uses a rewinding technique to make sure that overlapping subpaths can be filled using the correct fill rule. Note that rewinding inserts additional lines in the polygon so the outline of the fill polygon does not match the outline of the path.
Qt provides four classes for handling image data: QImage, QPixmap, QBitmap and QPicture. QImage is designed and optimized for I/O, and for direct pixel access and manipulation, while QPixmap is designed and optimized for showing images on screen. QBitmap is only a convenience class that inherits QPixmap, ensuring a depth of 1. Finally, the QPicture class is a paint device that records and replays QPainter commands.
QImage
is a QPaintDevice subclass, QPainter can be used to draw directly onto images. When using QPainter on a QImage, the painting can be performed in another thread than the current GUI thread.
The QImage class supports several image formats described by the Format enum. These include monochrome, 8-bit, 32-bit and alpha-blended images which are available in all versions of Qt 4.x.
QImage provides a collection of functions that can be used to obtain a variety of information about the image. There are also several functions that enables transformation of the image.
QImage objects can be passed around by value since the QImage class uses implicit data sharing. QImage objects can also be streamed and compared.
Reading and Writing Image Files
QImage provides several ways of loading an image file: The file can be loaded when constructing the QImage object, or by using the load() or loadFromData() functions later on. QImage also provides the static fromData() function, constructing a QImage from the given data. When loading an image, the file name can either refer to an actual file on disk or to one of the application’s embedded resources. See The Qt Resource System overview for details on how to embed images and other resource files in the application’s executable. Simply call the save() function to save a QImage object.
Image Information
QImage provides a collection of functions that can be used to obtain a variety of information about the image:
Available Functions
Geometry
The size(), width(), height(), dotsPerMeterX(), and dotsPerMeterY() functions provide information about the image size and aspect ratio.The rect() function returns the image’s enclosing rectangle. The valid() function tells if a given pair of coordinates is within this rectangle. The offset() function returns the number of pixels by which the image is intended to be offset by when positioned relative to other images, which also can be manipulated using the setOffset() function.
Colors
The color of a pixel can be retrieved by passing its coordinates to the pixel() function. The pixel() function returns the color as a QRgb value indepedent of the image’s format.In case of monochrome and 8-bit images, the colorCount() and colorTable() functions provide information about the color components used to store the image data: The colorTable() function returns the image’s entire color table. To obtain a single entry, use the pixelIndex() function to retrieve the pixel index for a given pair of coordinates, then use the color() function to retrieve the color. Note that if you create an 8-bit image manually, you have to set a valid color table on the image as well.The hasAlphaChannel() function tells if the image’s format respects the alpha channel, or not. The allGray() and isGrayscale() functions tell whether an image’s colors are all shades of gray.See also the Pixel Manipulation and Image Transformations sections.
Text
The text() function returns the image text associated with the given text key. An image’s text keys can be retrieved using the textKeys() function. Use the setText() function to alter an image’s text.
Low-level information
The depth() function returns the depth of the image. The supported depths are 1 (monochrome), 8, 16, 24 and 32 bits. The bitPlaneCount() function tells how many of those bits that are used. For more information see the Image Formats section.The format(), bytesPerLine(), and sizeInBytes() functions provide low-level information about the data stored in the image.The cacheKey() function returns a number that uniquely identifies the contents of this QImage object.
Pixel Manipulation
The functions used to manipulate an image’s pixels depend on the image format. The reason is that monochrome and 8-bit images are index-based and use a color lookup table, while 32-bit images store ARGB values directly. For more information on image formats, see the Image Formats section.
For images with more than 8-bit per color-channel. The methods setPixelColor() and pixelColor() can be used to set and get with QColor values.
QImage also provide the scanLine() function which returns a pointer to the pixel data at the scanline with the given index, and the bits() function which returns a pointer to the first pixel data (this is equivalent to scanLine(0)).
Image Formats
Each pixel stored in a QImage is represented by an integer. The size of the integer varies depending on the format. QImage supports several image formats described by the Format enum.
Monochrome images are stored using 1-bit indexes into a color table with at most two colors. There are two different types of monochrome images: big endian (MSB first) or little endian (LSB first) bit order.
8-bit images are stored using 8-bit indexes into a color table, i.e. they have a single byte per pixel. The color table is a QVector<QRgb>, and the QRgb typedef is equivalent to an unsigned int containing an ARGB quadruplet on the format 0xAARRGGBB.
32-bit images have no color table; instead, each pixel contains an QRgb value. There are three different types of 32-bit images storing RGB (i.e. 0xffRRGGBB), ARGB and premultiplied ARGB values respectively. In the premultiplied format the red, green, and blue channels are multiplied by the alpha component divided by 255.
An image’s format can be retrieved using the format() function. Use the convertToFormat() functions to convert an image into another format. The allGray() and isGrayscale() functions tell whether a color image can safely be converted to a grayscale image.
Image Transformations
QImage supports a number of functions for creating a new image that is a transformed version of the original: The createAlphaMask() function builds and returns a 1-bpp mask from the alpha buffer in this image, and the createHeuristicMask() function creates and returns a 1-bpp heuristic mask for this image. The latter function works by selecting a color from one of the corners, then chipping away pixels of that color starting at all the edges. createMaskFromColor to get mask for specific color
The mirrored() function returns a mirror of the image in the desired direction, the scaled() returns a copy of the image scaled to a rectangle of the desired measures, and the rgbSwapped() function constructs a BGR image from a RGB image.
The transformed() function returns a copy of the image that is transformed with the given transformation matrix and transformation mode: Internally, the transformation matrix is adjusted to compensate for unwanted translation, i.e. transformed() returns the smallest image containing all transformed points of the original image. The static trueMatrix() function returns the actual matrix used for transforming the image.
There are also functions for changing attributes of an image in-place:
QPixmap objects can be passed around by value since the QPixmap class uses implicit data sharing. For more information, see the Implicit Data Sharing documentation. QPixmap objects can also be streamed.
Note that the pixel data in a pixmap is internal and is managed by the underlying window system. Because QPixmap is a QPaintDevice subclass, QPainter can be used to draw directly onto pixmaps. Pixels can only be accessed through QPainter functions or by converting the QPixmap to a QImage. However, the fill() function is available for initializing the entire pixmap with a given color.
There are functions to convert between QImage and QPixmap. Typically, the QImage class is used to load an image file, optionally manipulating the image data, before the QImage object is converted into a QPixmap to be shown on screen. Alternatively, if no manipulation is desired, the image file can be loaded directly into a QPixmap.
and you can get pixmap from image by using fromImage static function.
Pixmap Information
QPixmap provides a collection of functions that can be used to obtain a variety of information about the pixmap:
Available Functions
Geometry
The size(), width() and height() functions provide information about the pixmap’s size. The rect() function returns the image’s enclosing rectangle.
Alpha component
The hasAlphaChannel() returns true if the pixmap has a format that respects the alpha channel, otherwise returns false. The hasAlpha(), setMask() and mask() functions are legacy and should not be used. They are potentially very slow.The createHeuristicMask() function creates and returns a 1-bpp heuristic mask (i.e. a QBitmap) for this pixmap. It works by selecting a color from one of the corners and then chipping away pixels of that color, starting at all the edges. The createMaskFromColor() function creates and returns a mask (i.e. a QBitmap) for the pixmap based on a given color.
Low-level information
The depth() function returns the depth of the pixmap. The defaultDepth() function returns the default depth, i.e. the depth used by the application on the given screen.The cacheKey() function returns a number that uniquely identifies the contents of the QPixmap object.
Pixmap Conversion
A QPixmap object can be converted into a QImage using the toImage() function. Likewise, a QImage can be converted into a QPixmap using the fromImage(). If this is too expensive an operation, you can use QBitmap::fromImage() instead.
To convert a QPixmap to and from HICON you can use the QtWinExtras functions QtWin::toHICON() and QtWin::fromHICON() respectively.
Pixmap Transformations
QPixmap supports a number of functions for creating a new pixmap that is a transformed version of the original:
The scaled(), scaledToWidth() and scaledToHeight() functions return scaled copies of the pixmap, while the copy() function creates a QPixmap that is a plain copy of the original one.
The transformed() function returns a copy of the pixmap that is transformed with the given transformation matrix and transformation mode: Internally, the transformation matrix is adjusted to compensate for unwanted translation, i.e. transformed() returns the smallest pixmap containing all transformed points of the original pixmap. The static trueMatrix() function returns the actual matrix used for transforming the pixmap.
//save pixmap
QPixmap pixmap;
QByteArray bytes;
QBuffer buffer(&bytes);
buffer.open(QIODevice::WriteOnly);
pixmap.save(&buffer, "PNG"); // writes pixmap into bytes in PNG format
//scroll pixels
QLabel label;
QPixmap pixmap("C:/Users/moham/OneDrive/Pictures/Capture.PNG");
pixmap.scroll(100,100,QRect(100,100,400,400));//copy rect and offset it
label.setPixmap(pixmap);
label.show();
QFont can be regarded as a query for one or more fonts on the system.
When you create a QFont object you specify various attributes that you want the font to have. Qt will use the font with the specified attributes, or if no matching font exists, Qt will use the closest matching installed font. The attributes of the font that is actually used are retrievable from a QFontInfo object. If the window system provides an exact match exactMatch() returns true. Use QFontMetricsF to get measurements, e.g. the pixel length of a string using QFontMetrics::width().
Attributes which are not specifically set will not affect the font selection algorithm, and default values will be preferred instead.
To load a specific physical font, typically represented by a single file, use QRawFont instead.
If a chosen font does not include all the characters that need to be displayed, QFont will try to find the characters in the nearest equivalent fonts. When a QPainter draws a character from a font the QFont will report whether or not it has the character; if it does not, QPainter will draw an unfilled square.
The attributes set in the constructor can also be set later, e.g. setFamily(), setPointSize(), setPointSizeF(), setWeight() and setItalic(). The remaining attributes must be set after contstruction, e.g. setBold(), setUnderline(), setOverline(), setStrikeOut() and setFixedPitch(). QFontInfo objects should be created after the font’s attributes have been set. A QFontInfo object will not change, even if you change the font’s attributes. The corresponding “get” functions, e.g. family(), pointSize(), etc., return the values that were set, even though the values used may differ. The actual values are available from a QFontInfo object.
You can provide substitutions for font family names using insertSubstitution() and insertSubstitutions(). Substitutions can be removed with removeSubstitutions(). Use substitute() to retrieve a family’s first substitute, or the family name itself if it has no substitutes. Use substitutes() to retrieve a list of a family’s substitutes (which may be empty). After substituting a font, you must trigger the updating of the font by destroying and re-creating all QFont objects.
Every QFont has a key() which you can use, for example, as the key in a cache or dictionary. If you want to store a user’s font preferences you could use QSettings, writing the font information with toString() and reading it back with fromString(). The operator<<() and operator>>() functions are also available, but they work on a data stream.
It is possible to set the height of characters shown on the screen to a specified number of pixels with setPixelSize(); however using setPointSize() has a similar effect and provides device independence.
The font matching algorithm works as follows:
The specified font families (set by setFamilies()) are searched for.
If not found, then if set the specified font family exists and can be used to represent the writing system in use, it will be selected.
If not, a replacement font that supports the writing system is selected. The font matching algorithm will try to find the best match for all the properties set in the QFont. How this is done varies from platform to platform.
If no font exists on the system that can support the text, then special “missing character” boxes will be shown in its place.
Note: If the selected font, though supporting the writing system in general, is missing glyphs for one or more specific characters, then Qt will try to find a fallback font for this or these particular characters. This feature can be disabled using QFont::NoFontMerging style strategy.
In Windows a request for the “Courier” font is automatically changed to “Courier New”, an improved version of Courier that allows for smooth scaling. The older “Courier” bitmap font can be selected by setting the PreferBitmap style strategy (see setStyleStrategy()).
Once a font is found, the remaining attributes are matched in order of priority:
If you have a font which matches on family, even if none of the other attributes match, this font will be chosen in preference to a font which doesn’t match on family but which does match on the other attributes. This is because font family is the dominant search criteria.
The point size is defined to match if it is within 20% of the requested point size. When several fonts match and are only distinguished by point size, the font with the closest point size to the one requested will be chosen.
The actual family, font size, weight and other font attributes used for drawing text will depend on what’s available for the chosen family under the window system. A QFontInfo object can be used to determine the actual values used for drawing the text.
QFontMetrics fm(f1);
int textWidthInPixels = fm.horizontalAdvance("How many pixels wide is this text?");
int textHeightInPixels = fm.height();
QRect rect = fm.boundingRect("hello");
QFontDatabase : The most common uses of this class are to query the database for the list of font families() and for the pointSizes() and styles() that are available for each family. An alternative to pointSizes() is smoothSizes() which returns the sizes at which a given family and style will look attractive. addApplicationFont , addApplicationFontFromData to load font file
The widget is the atom of the user interface: it receives mouse, keyboard and other events from the window system, and paints a representation of itself on the screen. Every widget is rectangular, and they are sorted in a Z-order. A widget is clipped by its parent and by the widgets in front of it.
A widget that is not embedded in a parent widget is called a window. Usually, windows have a frame and a title bar, although it is also possible to create windows without such decoration using suitable window flags). In Qt, QMainWindow and the various subclasses of QDialog are the most common window types.
Every widget’s constructor accepts one or two standard arguments:
QWidget *parent = nullptr is the parent of the new widget. If it is nullptr (the default), the new widget will be a window. If not, it will be a child of parent, and be constrained by parent‘s geometry (unless you specify Qt::Window as window flag).
Qt::WindowFlags f = { } (where available) sets the window flags; the default is suitable for almost all widgets, but to get, for example, a window without a window system frame, you must use special flags.
QWidget has many member functions, but some of them have little direct functionality; for example, QWidget has a font property, but never uses this itself. There are many subclasses which provide real functionality, such as QLabel, QPushButton, QListWidget, and QTabWidget.
Top-Level and Child Widgets
A widget without a parent widget is always an independent window (top-level widget). For these widgets, setWindowTitle() and setWindowIcon() set the title bar and icon respectively.
Non-window widgets are child widgets, displayed within their parent widgets. Most widgets in Qt are mainly useful as child widgets. For example, it is possible to display a button as a top-level window, but most people prefer to put their buttons inside other widgets, such as QDialog.
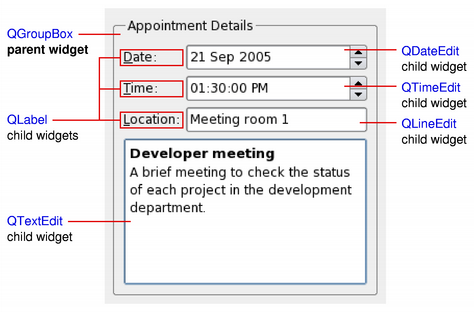
The diagram above shows a QGroupBox widget being used to hold various child widgets in a layout provided by QGridLayout. The QLabel child widgets have been outlined to indicate their full sizes.
If you want to use a QWidget to hold child widgets you will usually want to add a layout to the parent QWidget. See Layout Management for more information.
Composite Widgets
When a widget is used as a container to group a number of child widgets, it is known as a composite widget. These can be created by constructing a widget with the required visual properties – a QFrame, for example – and adding child widgets to it, usually managed by a layout. The above diagram shows such a composite widget that was created using Qt Designer.
Composite widgets can also be created by subclassing a standard widget, such as QWidget or QFrame, and adding the necessary layout and child widgets in the constructor of the subclass. Many of the examples provided with Qt use this approach, and it is also covered in the Qt Tutorials.
Custom Widgets and Painting
Since QWidget is a subclass of QPaintDevice, subclasses can be used to display custom content that is composed using a series of painting operations with an instance of the QPainter class. This approach contrasts with the canvas-style approach used by the Graphics View Framework where items are added to a scene by the application and are rendered by the framework itself.
Each widget performs all painting operations from within its paintEvent() function. This is called whenever the widget needs to be redrawn, either as a result of some external change or when requested by the application.
Size Hints and Size Policies
When implementing a new widget, it is almost always useful to reimplement sizeHint() to provide a reasonable default size for the widget and to set the correct size policy with setSizePolicy().
By default, composite widgets which do not provide a size hint will be sized according to the space requirements of their child widgets.
The size policy lets you supply good default behavior for the layout management system, so that other widgets can contain and manage yours easily. The default size policy indicates that the size hint represents the preferred size of the widget, and this is often good enough for many widgets.
Events
Widgets respond to events that are typically caused by user actions. Qt delivers events to widgets by calling specific event handler functions with instances of QEvent subclasses containing information about each event.
If your widget only contains child widgets, you probably do not need to implement any event handlers. If you want to detect a mouse click in a child widget call the child’s underMouse() function inside the widget’s mousePressEvent().
The Scribble example implements a wider set of events to handle mouse movement, button presses, and window resizing.
You will need to supply the behavior and content for your own widgets, but here is a brief overview of the events that are relevant to QWidget, starting with the most common ones:
paintEvent() is called whenever the widget needs to be repainted. Every widget displaying custom content must implement it. Painting using a QPainter can only take place in a paintEvent() or a function called by a paintEvent().
resizeEvent() is called when the widget has been resized.
mousePressEvent() is called when a mouse button is pressed while the mouse cursor is inside the widget, or when the widget has grabbed the mouse using grabMouse(). Pressing the mouse without releasing it is effectively the same as calling grabMouse().
mouseReleaseEvent() is called when a mouse button is released. A widget receives mouse release events when it has received the corresponding mouse press event. This means that if the user presses the mouse inside your widget, then drags the mouse somewhere else before releasing the mouse button, your widget receives the release event. There is one exception: if a popup menu appears while the mouse button is held down, this popup immediately steals the mouse events.
mouseDoubleClickEvent() is called when the user double-clicks in the widget. If the user double-clicks, the widget receives a mouse press event, a mouse release event, (a mouse click event,) a second mouse press, this event and finally a second mouse release event. (Some mouse move events may also be received if the mouse is not held steady during this operation.) It is not possible to distinguish a click from a double-click until the second click arrives. (This is one reason why most GUI books recommend that double-clicks be an extension of single-clicks, rather than trigger a different action.)
Widgets that accept keyboard input need to reimplement a few more event handlers:
keyPressEvent() is called whenever a key is pressed, and again when a key has been held down long enough for it to auto-repeat. The Tab and Shift+Tab keys are only passed to the widget if they are not used by the focus-change mechanisms. To force those keys to be processed by your widget, you must reimplement QWidget::event().
focusInEvent() is called when the widget gains keyboard focus (assuming you have called setFocusPolicy()). Well-behaved widgets indicate that they own the keyboard focus in a clear but discreet way.
focusOutEvent() is called when the widget loses keyboard focus.
You may be required to also reimplement some of the less common event handlers:
mouseMoveEvent() is called whenever the mouse moves while a mouse button is held down. This can be useful during drag and drop operations. If you call setMouseTracking(true), you get mouse move events even when no buttons are held down. (See also the Drag and Drop guide.)
keyReleaseEvent() is called whenever a key is released and while it is held down (if the key is auto-repeating). In that case, the widget will receive a pair of key release and key press event for every repeat. The Tab and Shift+Tab keys are only passed to the widget if they are not used by the focus-change mechanisms. To force those keys to be processed by your widget, you must reimplement QWidget::event().
wheelEvent() is called whenever the user turns the mouse wheel while the widget has the focus.
enterEvent() is called when the mouse enters the widget’s screen space. (This excludes screen space owned by any of the widget’s children.)
leaveEvent() is called when the mouse leaves the widget’s screen space. If the mouse enters a child widget it will not cause a leaveEvent().
moveEvent() is called when the widget has been moved relative to its parent.
closeEvent() is called when the user closes the widget (or when close() is called).
The easiest way to give your widgets a good layout is to use the built-in layout managers: QHBoxLayout, QVBoxLayout, QGridLayout, QStackedLayout and QFormLayout. These classes inherit from QLayout, which in turn derives from QObject (not QWidget). They take care of geometry management for a set of widgets. To create more complex layouts, you can nest layout managers inside each other.
A QHBoxLayout lays out widgets in a horizontal row, from left to right (or right to left for right-to-left languages).
A QVBoxLayout lays out widgets in a vertical column, from top to bottom.
A QGridLayout lays out widgets in a two-dimensional grid. Widgets can occupy multiple cells.
A QFormLayout lays out widgets in a 2-column descriptive label- field style.
QWidget *window = new QWidget;
    QPushButton *button1 = new QPushButton("One");
    QPushButton *button2 = new QPushButton("Two");
    QPushButton *button3 = new QPushButton("Three");
    QPushButton *button4 = new QPushButton("Four");
    QPushButton *button5 = new QPushButton("Five");

    QHBoxLayout *layout = new QHBoxLayout;
    layout->addWidget(button1);
    layout->addWidget(button2);
    layout->addWidget(button3);
    layout->addWidget(button4);
    layout->addWidget(button5);

    window->setLayout(layout);
    window->show();
QWidget *window = new QWidget;
QPushButton *button1 = new QPushButton("One");
QPushButton *button2 = new QPushButton("Two");
QPushButton *button3 = new QPushButton("Three");
QPushButton *button4 = new QPushButton("Four");
QPushButton *button5 = new QPushButton("Five");
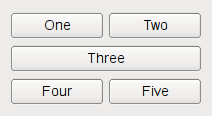
QGridLayout *layout = new QGridLayout;
layout->addWidget(button1, 0, 0);
layout->addWidget(button2, 0, 1);
layout->addWidget(button3, 1, 0, 1, 2);
layout->addWidget(button4, 2, 0);
layout->addWidget(button5, 2, 1);
window->setLayout(layout);
window->show();
QWidget *window = new QWidget;
QPushButton *button1 = new QPushButton("One");
QLineEdit *lineEdit1 = new QLineEdit();
QPushButton *button2 = new QPushButton("Two");
QLineEdit *lineEdit2 = new QLineEdit();
QPushButton *button3 = new QPushButton("Three");
QLineEdit *lineEdit3 = new QLineEdit();
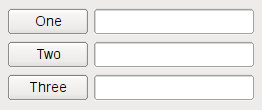
QFormLayout *layout = new QFormLayout;
layout->addRow(button1, lineEdit1);
layout->addRow(button2, lineEdit2);
layout->addRow(button3, lineEdit3);
window->setLayout(layout);
window->show();
Note: Widgets in a layout are children of the widget on which the layout is installed, not of the layout itself. Widgets can only have other widgets as parent, not layouts.
You can nest layouts using addLayout() on a layout; the inner layout then becomes a child of the layout it is inserted into.
Adding Widgets to a Layout
When you add widgets to a layout, the layout process works as follows:
If any of the widgets have stretch factors set, with a value greater than zero, then they are allocated space in proportion to their stretch factor (explained below).
If any of the widgets have stretch factors set to zero they will only get more space if no other widgets want the space. Of these, space is allocated to widgets with an Expanding size policy first.
Any widgets that are allocated less space than their minimum size (or minimum size hint if no minimum size is specified) are allocated this minimum size they require. (Widgets don’t have to have a minimum size or minimum size hint in which case the stretch factor is their determining factor.)
Any widgets that are allocated more space than their maximum size are allocated the maximum size space they require. (Widgets do not have to have a maximum size in which case the stretch factor is their determining factor.)
Stretch Factors
Widgets are normally created without any stretch factor set. When they are laid out in a layout the widgets are given a share of space in accordance with their QWidget::sizePolicy() or their minimum size hint whichever is the greater. Stretch factors are used to change how much space widgets are given in proportion to one another.
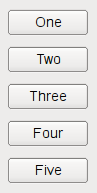
If we have three widgets laid out using a QHBoxLayout with no stretch factors set we will get a layout like this:
If we apply stretch factors to each widget, they will be laid out in proportion (but never less than their minimum size hint), e.g.
Custom Widgets in Layouts
When you make your own widget class, you should also communicate its layout properties. If the widget uses one of Qt’s layouts, this is already taken care of. If the widget does not have any child widgets, or uses a manual layout, you can change the behavior of the widget using any or all of the following mechanisms:
Reimplement QWidget::sizeHint() to return the preferred size of the widget.
Call QWidget::updateGeometry() whenever the size hint, minimum size hint or size policy changes. This will cause a layout recalculation. Multiple consecutive calls to QWidget::updateGeometry() will only cause one layout recalculation.
If the preferred height of your widget depends on its actual width (e.g., a label with automatic word-breaking), set the height-for-width flag in the widget’s size policy and reimplement QWidget::heightForWidth().
Even if you implement QWidget::heightForWidth(), it is still a good idea to provide a reasonable sizeHint().
For further guidance when implementing these functions, see the Qt Quarterly article Trading Height for Width.
//window id
QFrame frame1,frame2(&frame1),frame3(&frame2),frame4(&frame3);
qDebug()<<(frame4.window()->winId()==frame1.winId());//true
frame1.find(frame4.winId()).hide();
//widget scroll you can use QScrollArea instead
QWidget frame1;
QLabel label1(" one ",&frame1), label2(" two ",&frame1), label3(" three ",&frame1);
label1.setGeometry(50,50,100,100);
label2.setGeometry(200,50,100,100);
label3.setGeometry(350,50,100,100);
frame1.resize(200,200);
frame1.show();
frame1.scroll(-120,0);//scroll right
void mousePressEvent(QMouseEvent *event) override{
   qDebug()<<"press on it";
}
QWidget frame1;
QPushButton button1(" one ",&frame1), button2(" two ",&frame1), button3(" three ",&frame1);
TObject1 to(&frame1);
button1.setGeometry(50,50,100,100);
button2.setGeometry(200,50,100,100);
button3.setGeometry(350,50,100,100);
to.setGeometry(500,50,100,100);
to.grabMouse();//buttons never take any mouse events all events grabbed by to
note : if you want to take QPixmap for widget use grab